This is a very easy cake to make in a hurry that is still very delicious and worthy of a family gathering. The basic recipe has been around forever and used in our household over and over.
It’s one of those basic recipes that is super simple to change out the flavors with different flavors of gelatin and fruit. Try peach, raspberry, apricot, blackberry or cherry! Use orange juice concentrate in place of puréed fruit for a very refreshing cake. All very flavors good!
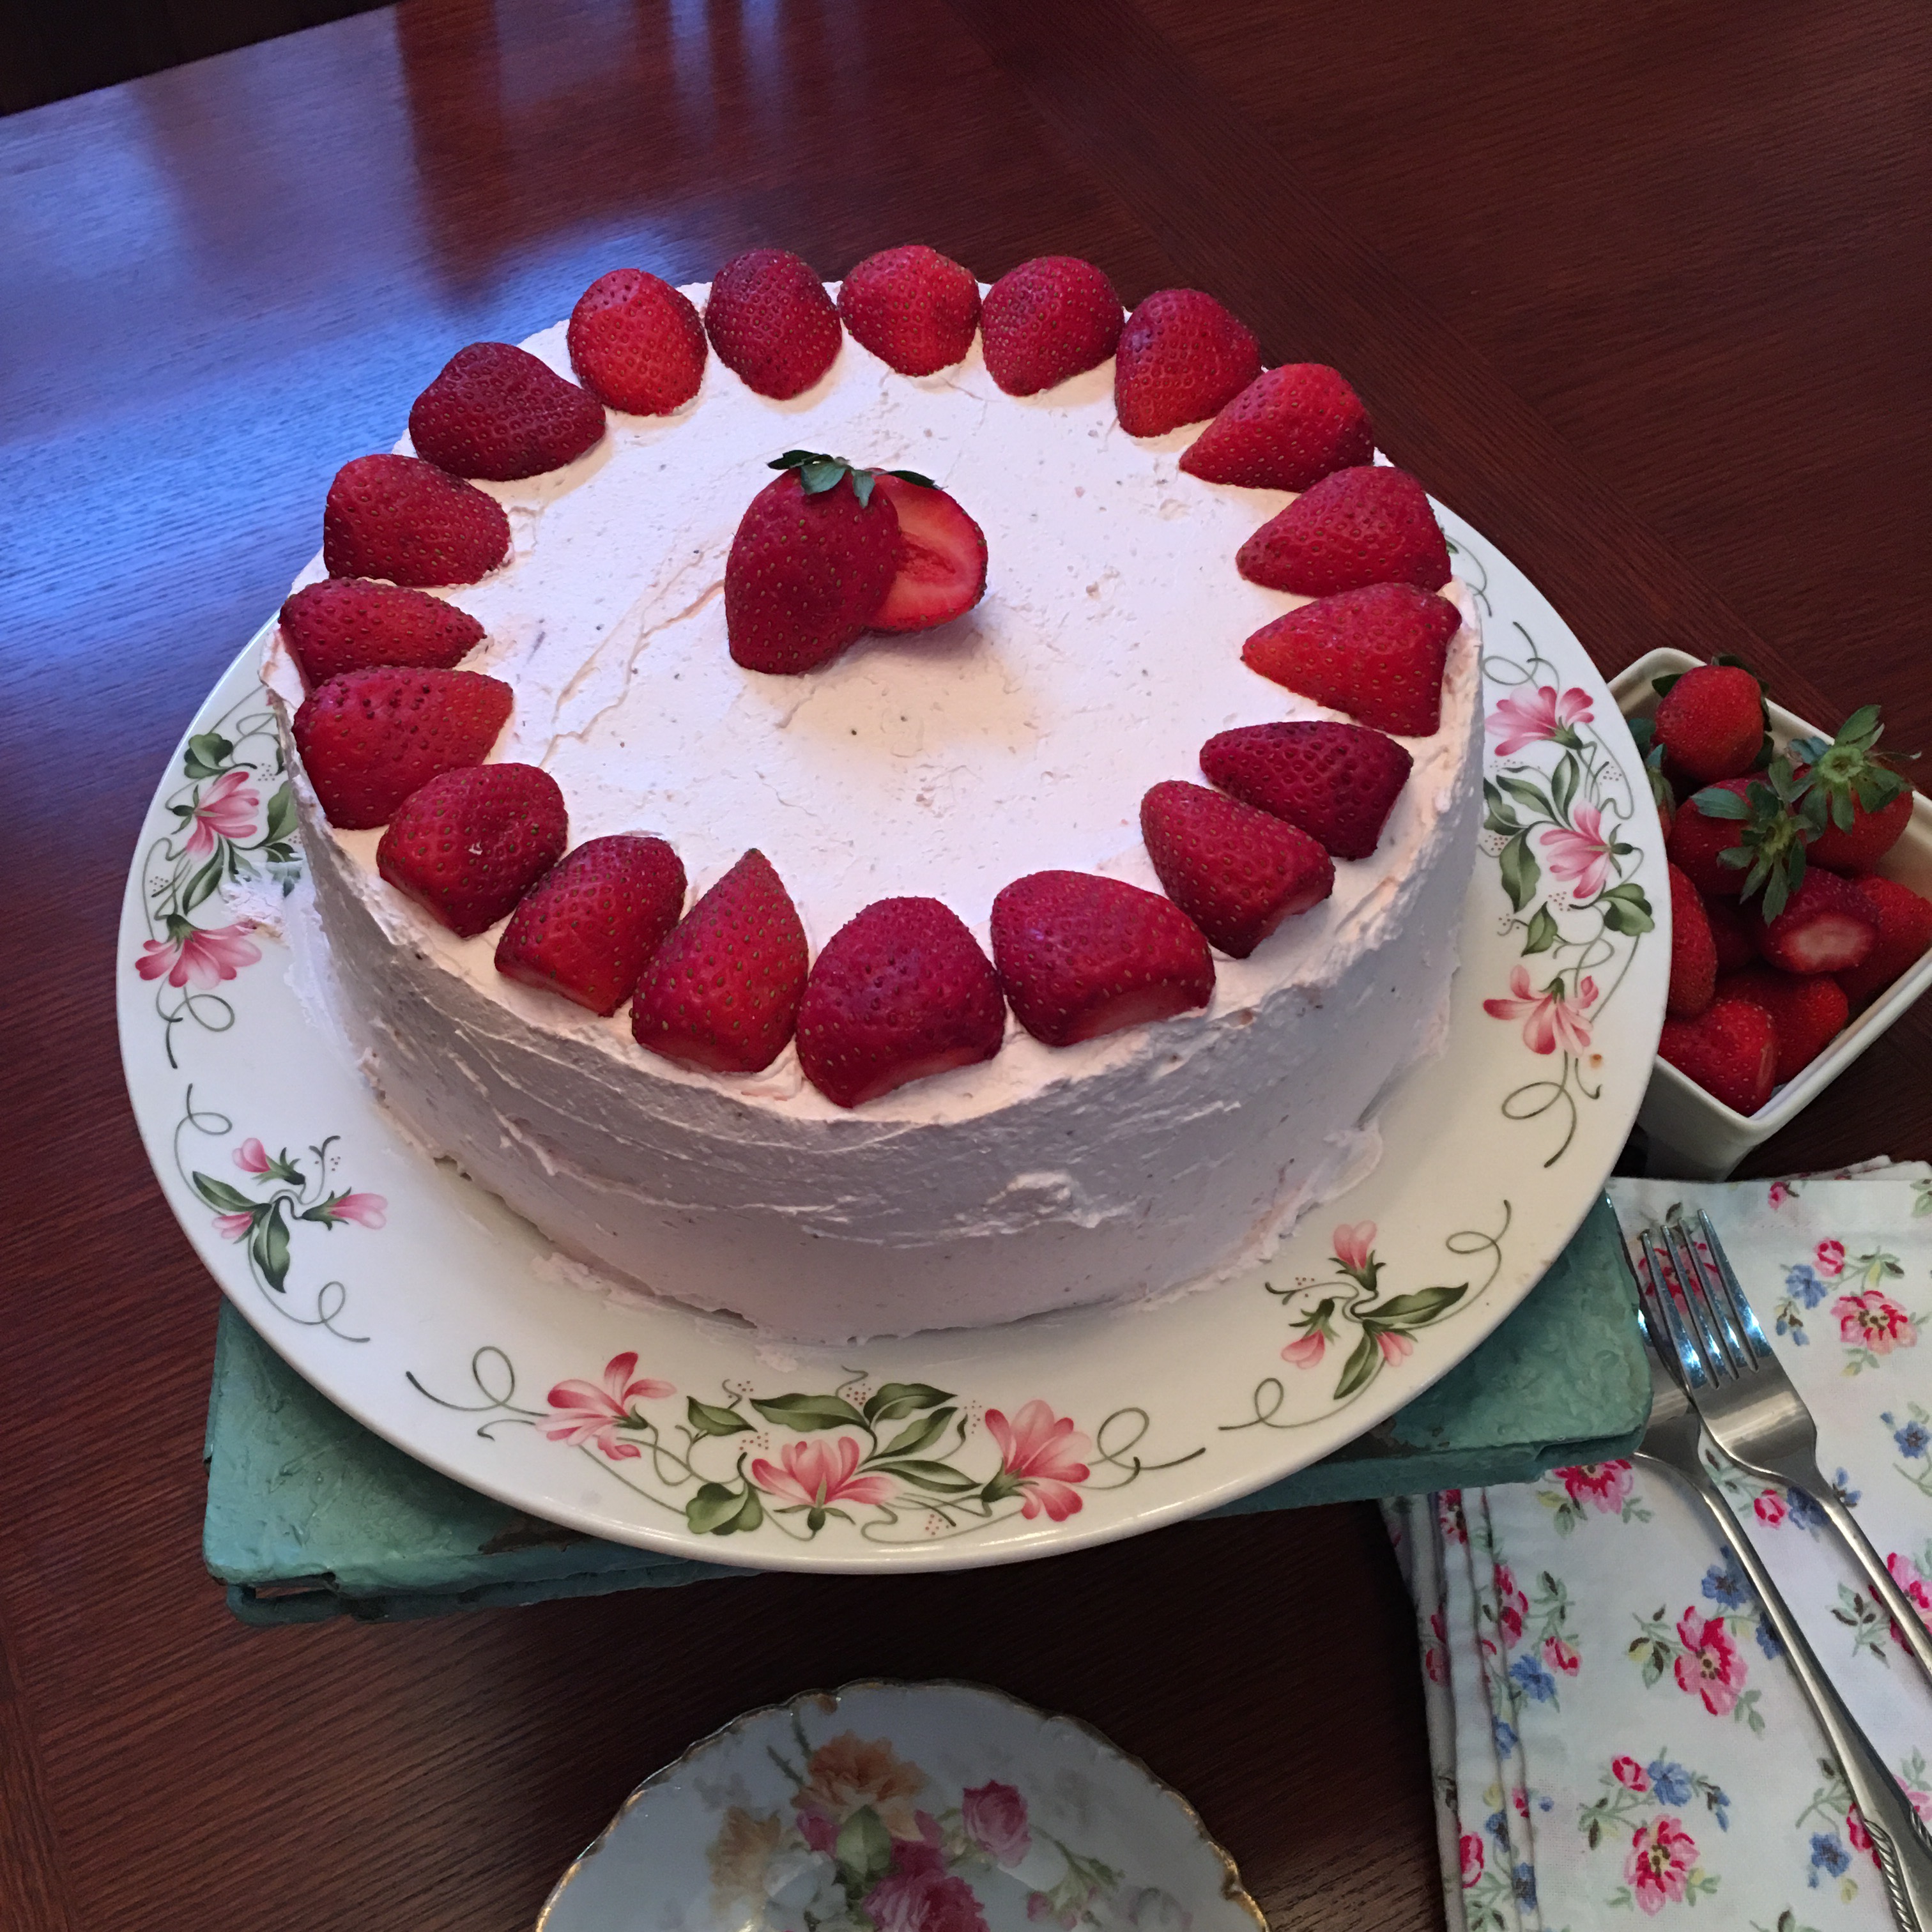
Strawberry buttercream frosting is really yummy on this cake, but this time I decided to use a refreshing Cool Whip strawberry frosting to lighten it up. By the way… The Cool Whip flavored this way is great in a trifle or just spooned into perfect cups with fresh fruit.
Be sure to share how you used these recipes!! We’d love to see your cakes and deserts!
Here’s a beginning bakers guide to preparing your cake pans.
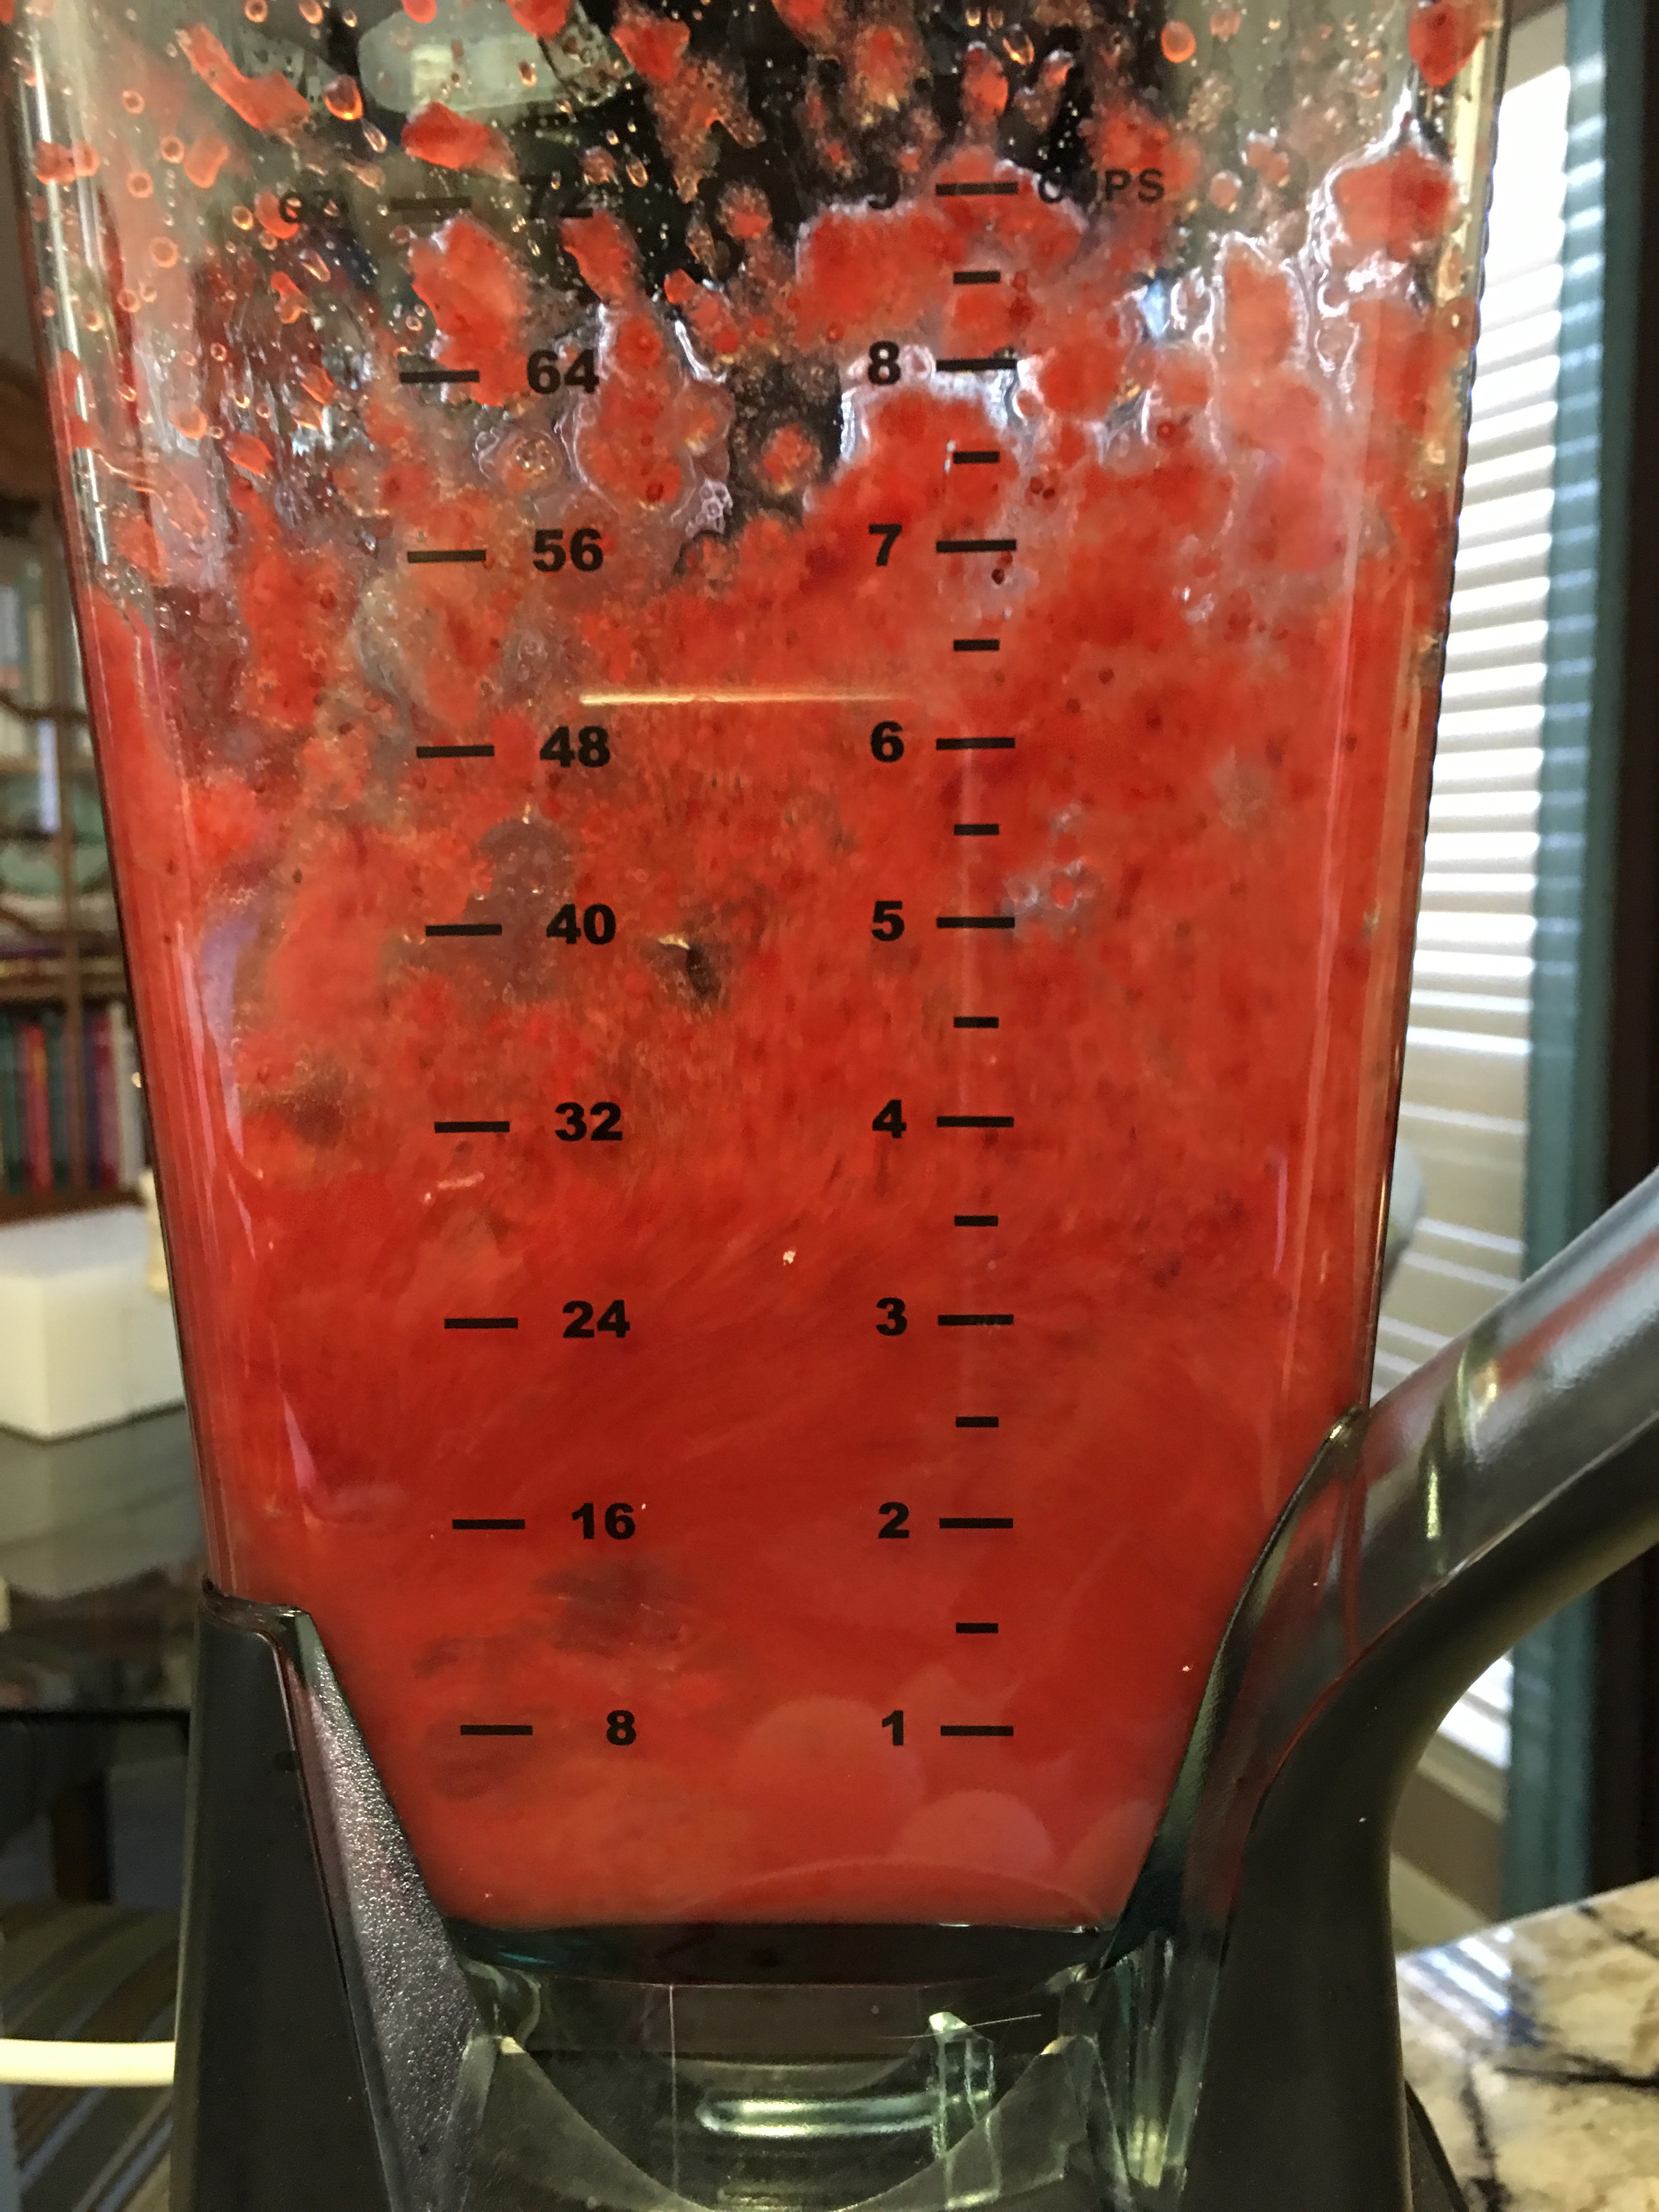
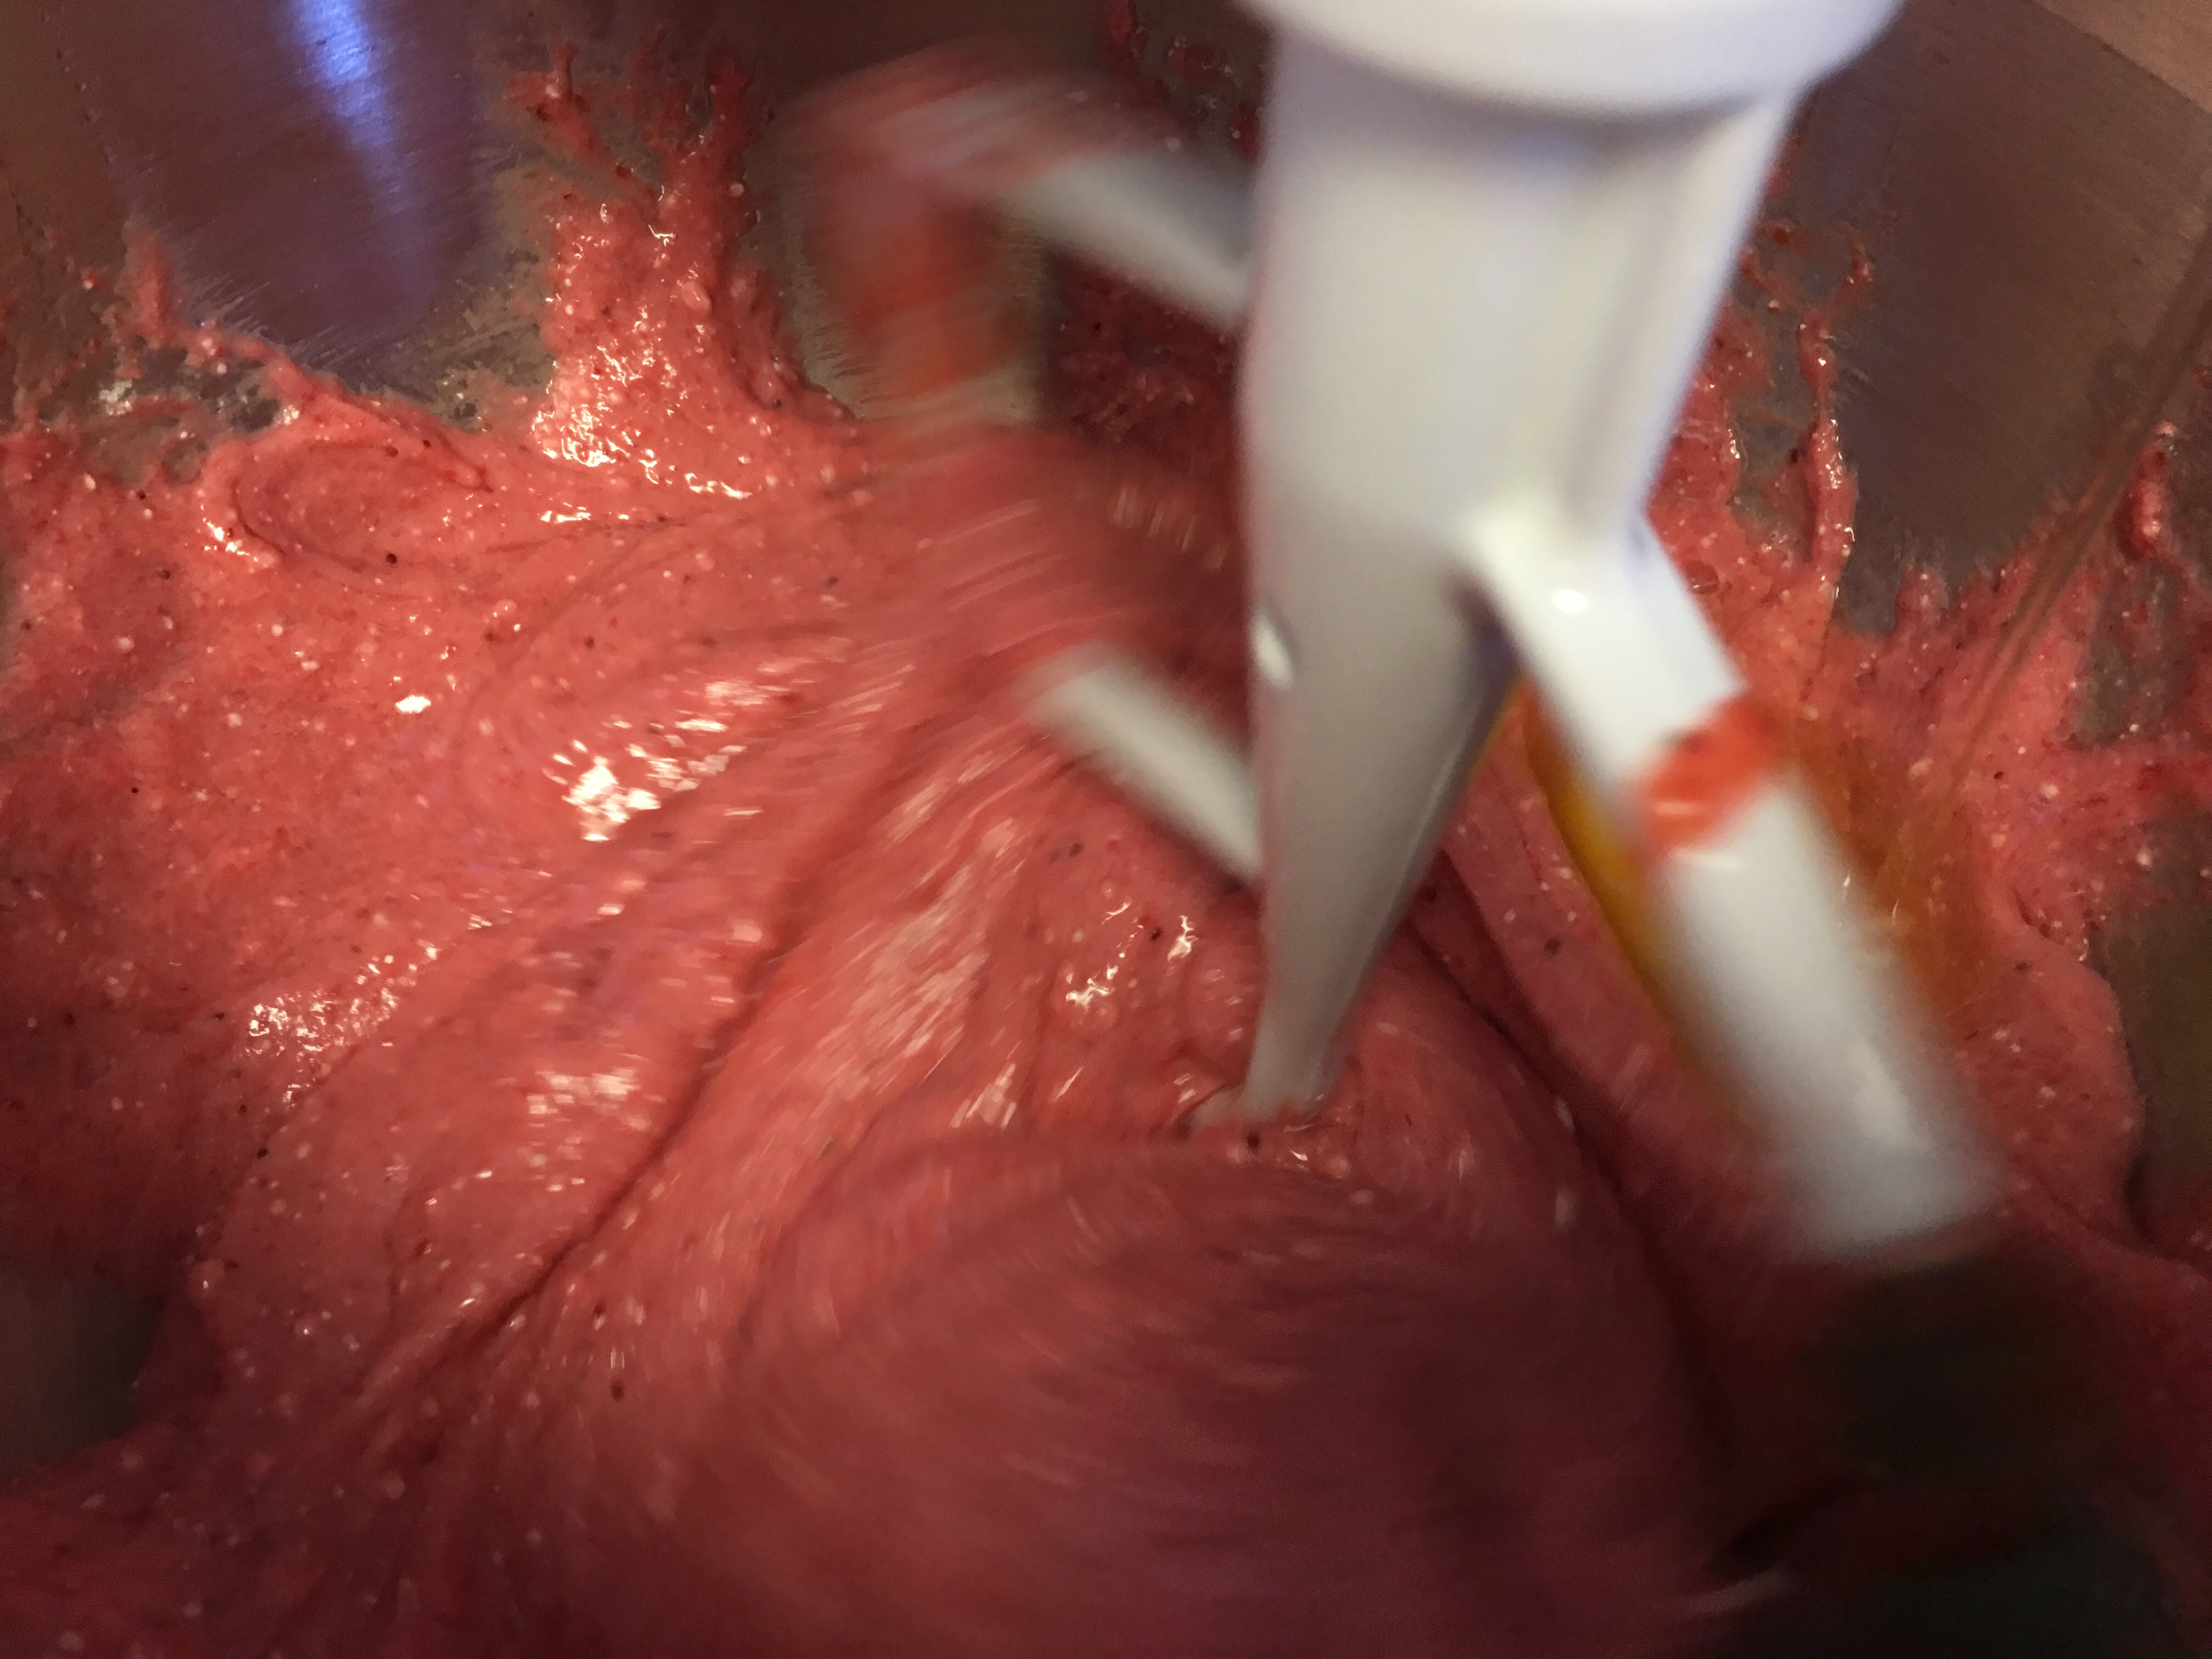
Purée frozen strawberries to be added to cake batter.
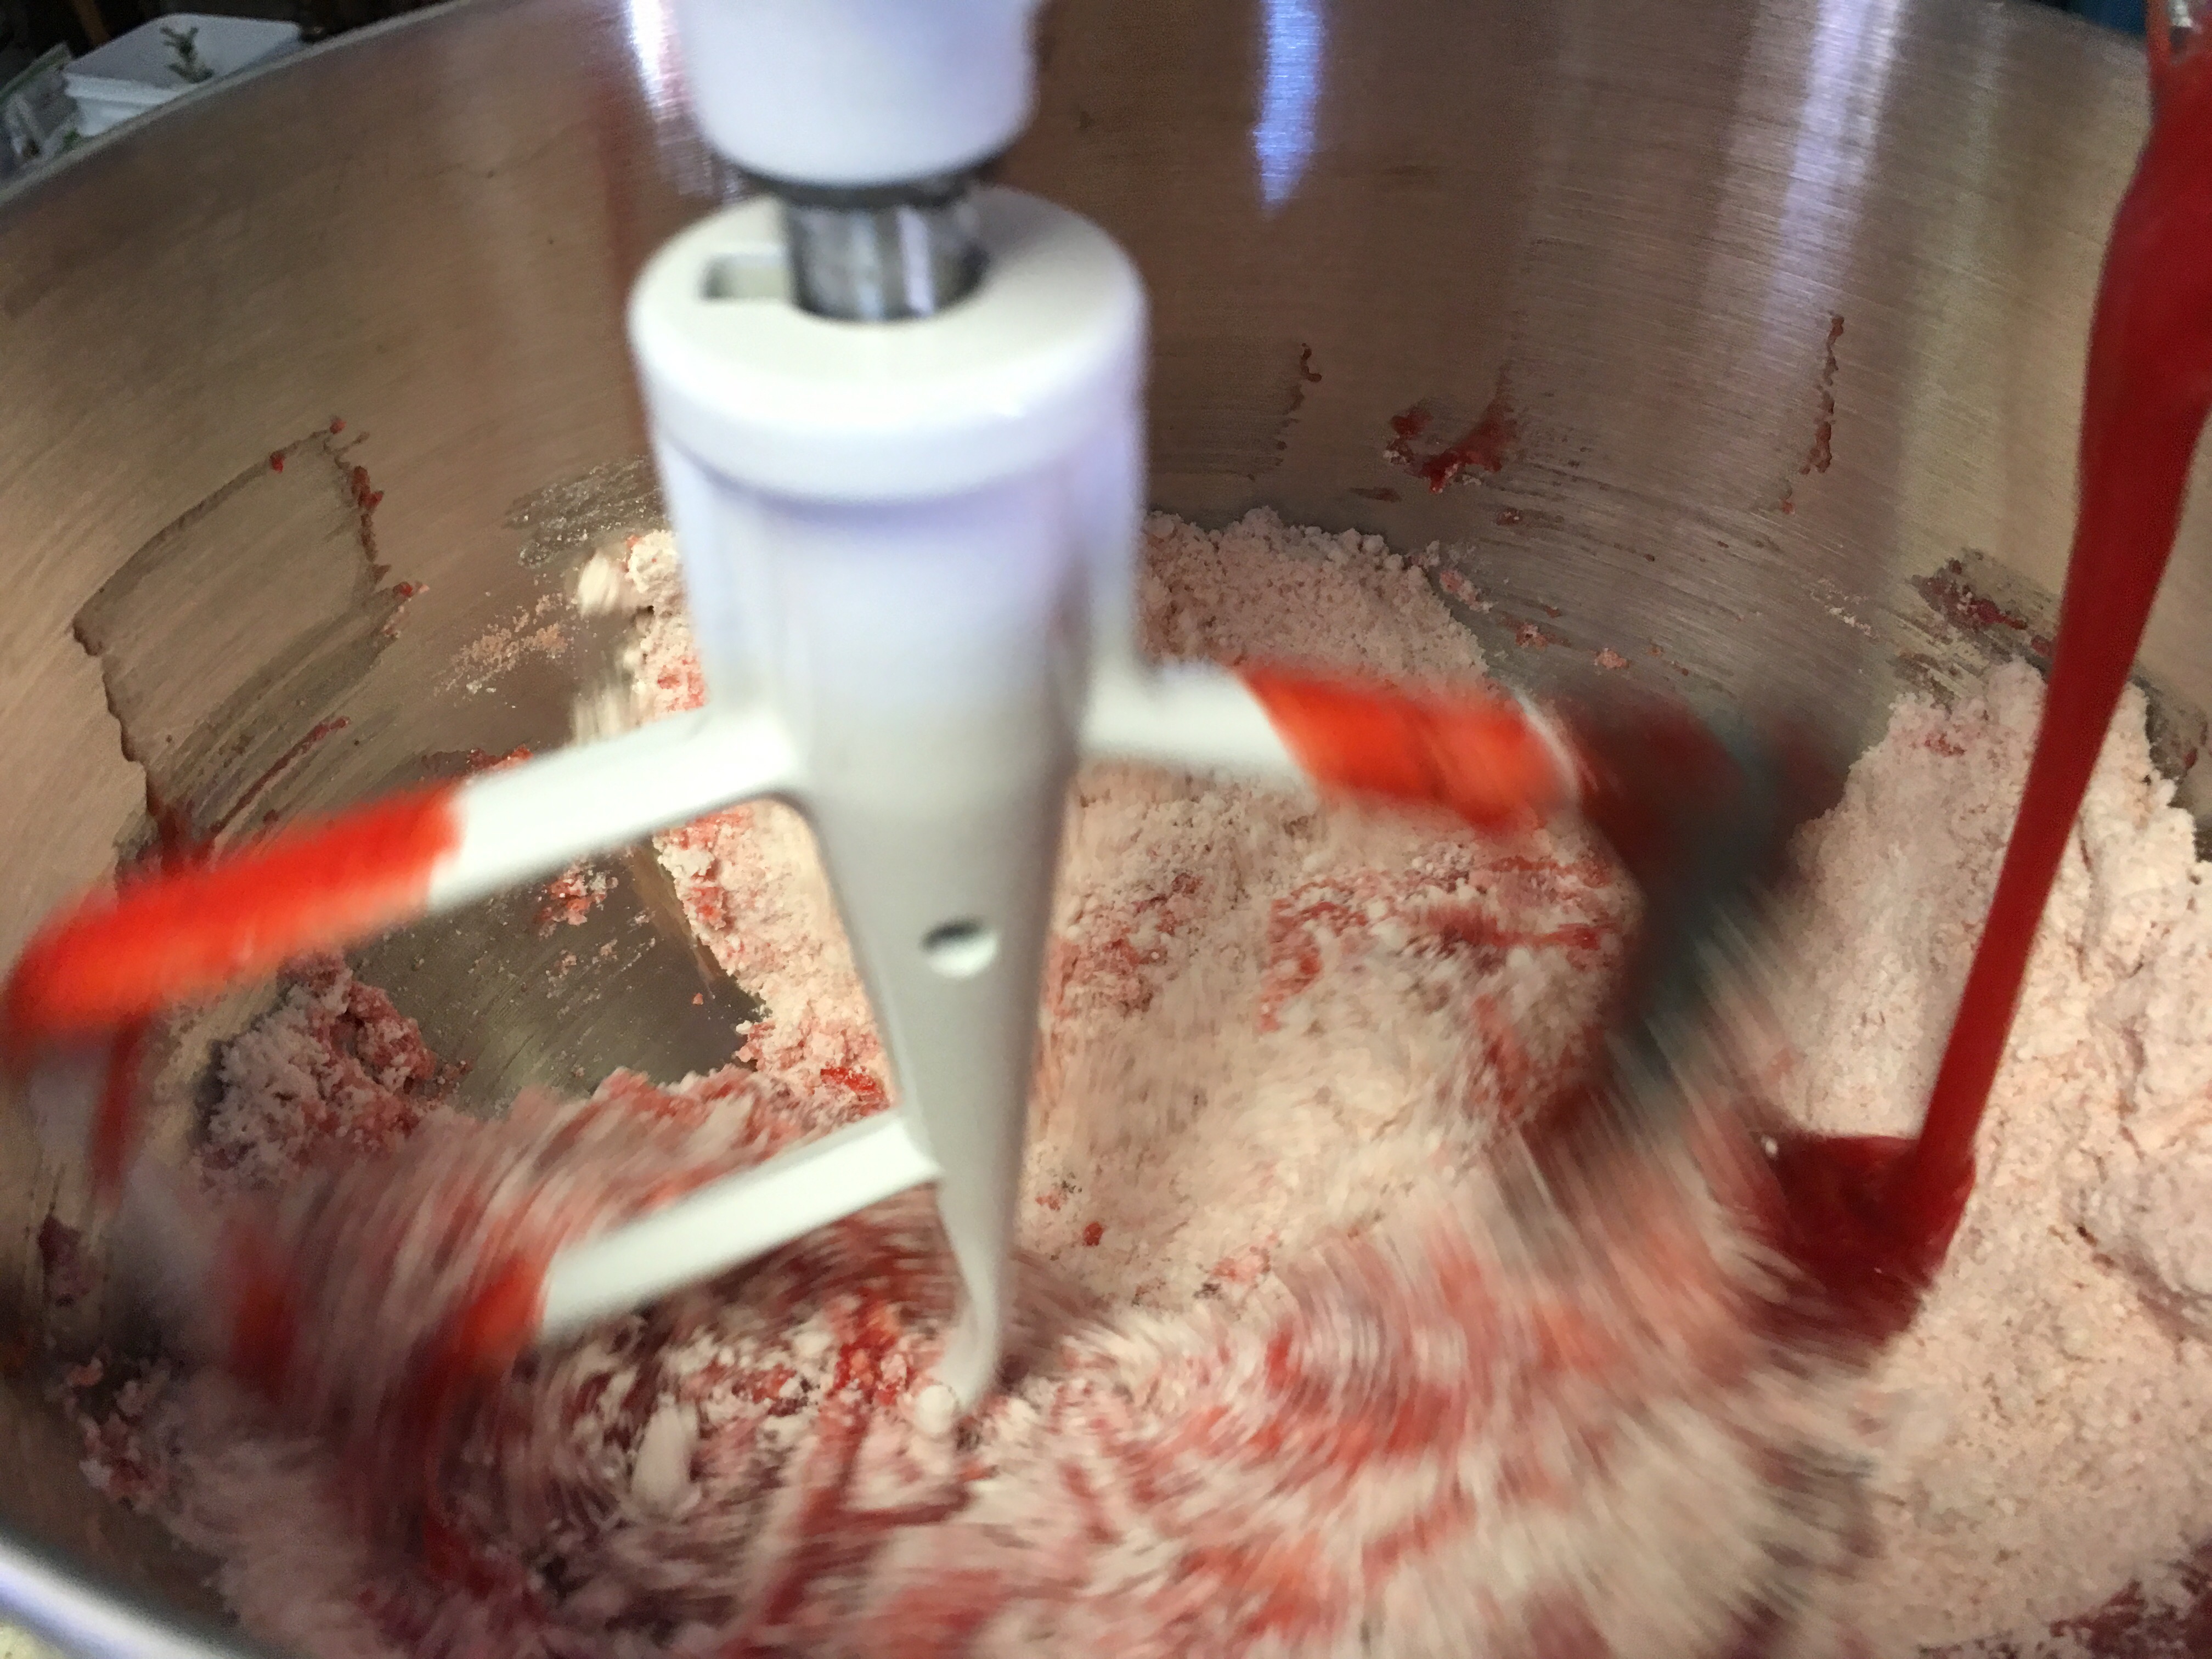
Slowly pour purée into the batter.
Mix well.
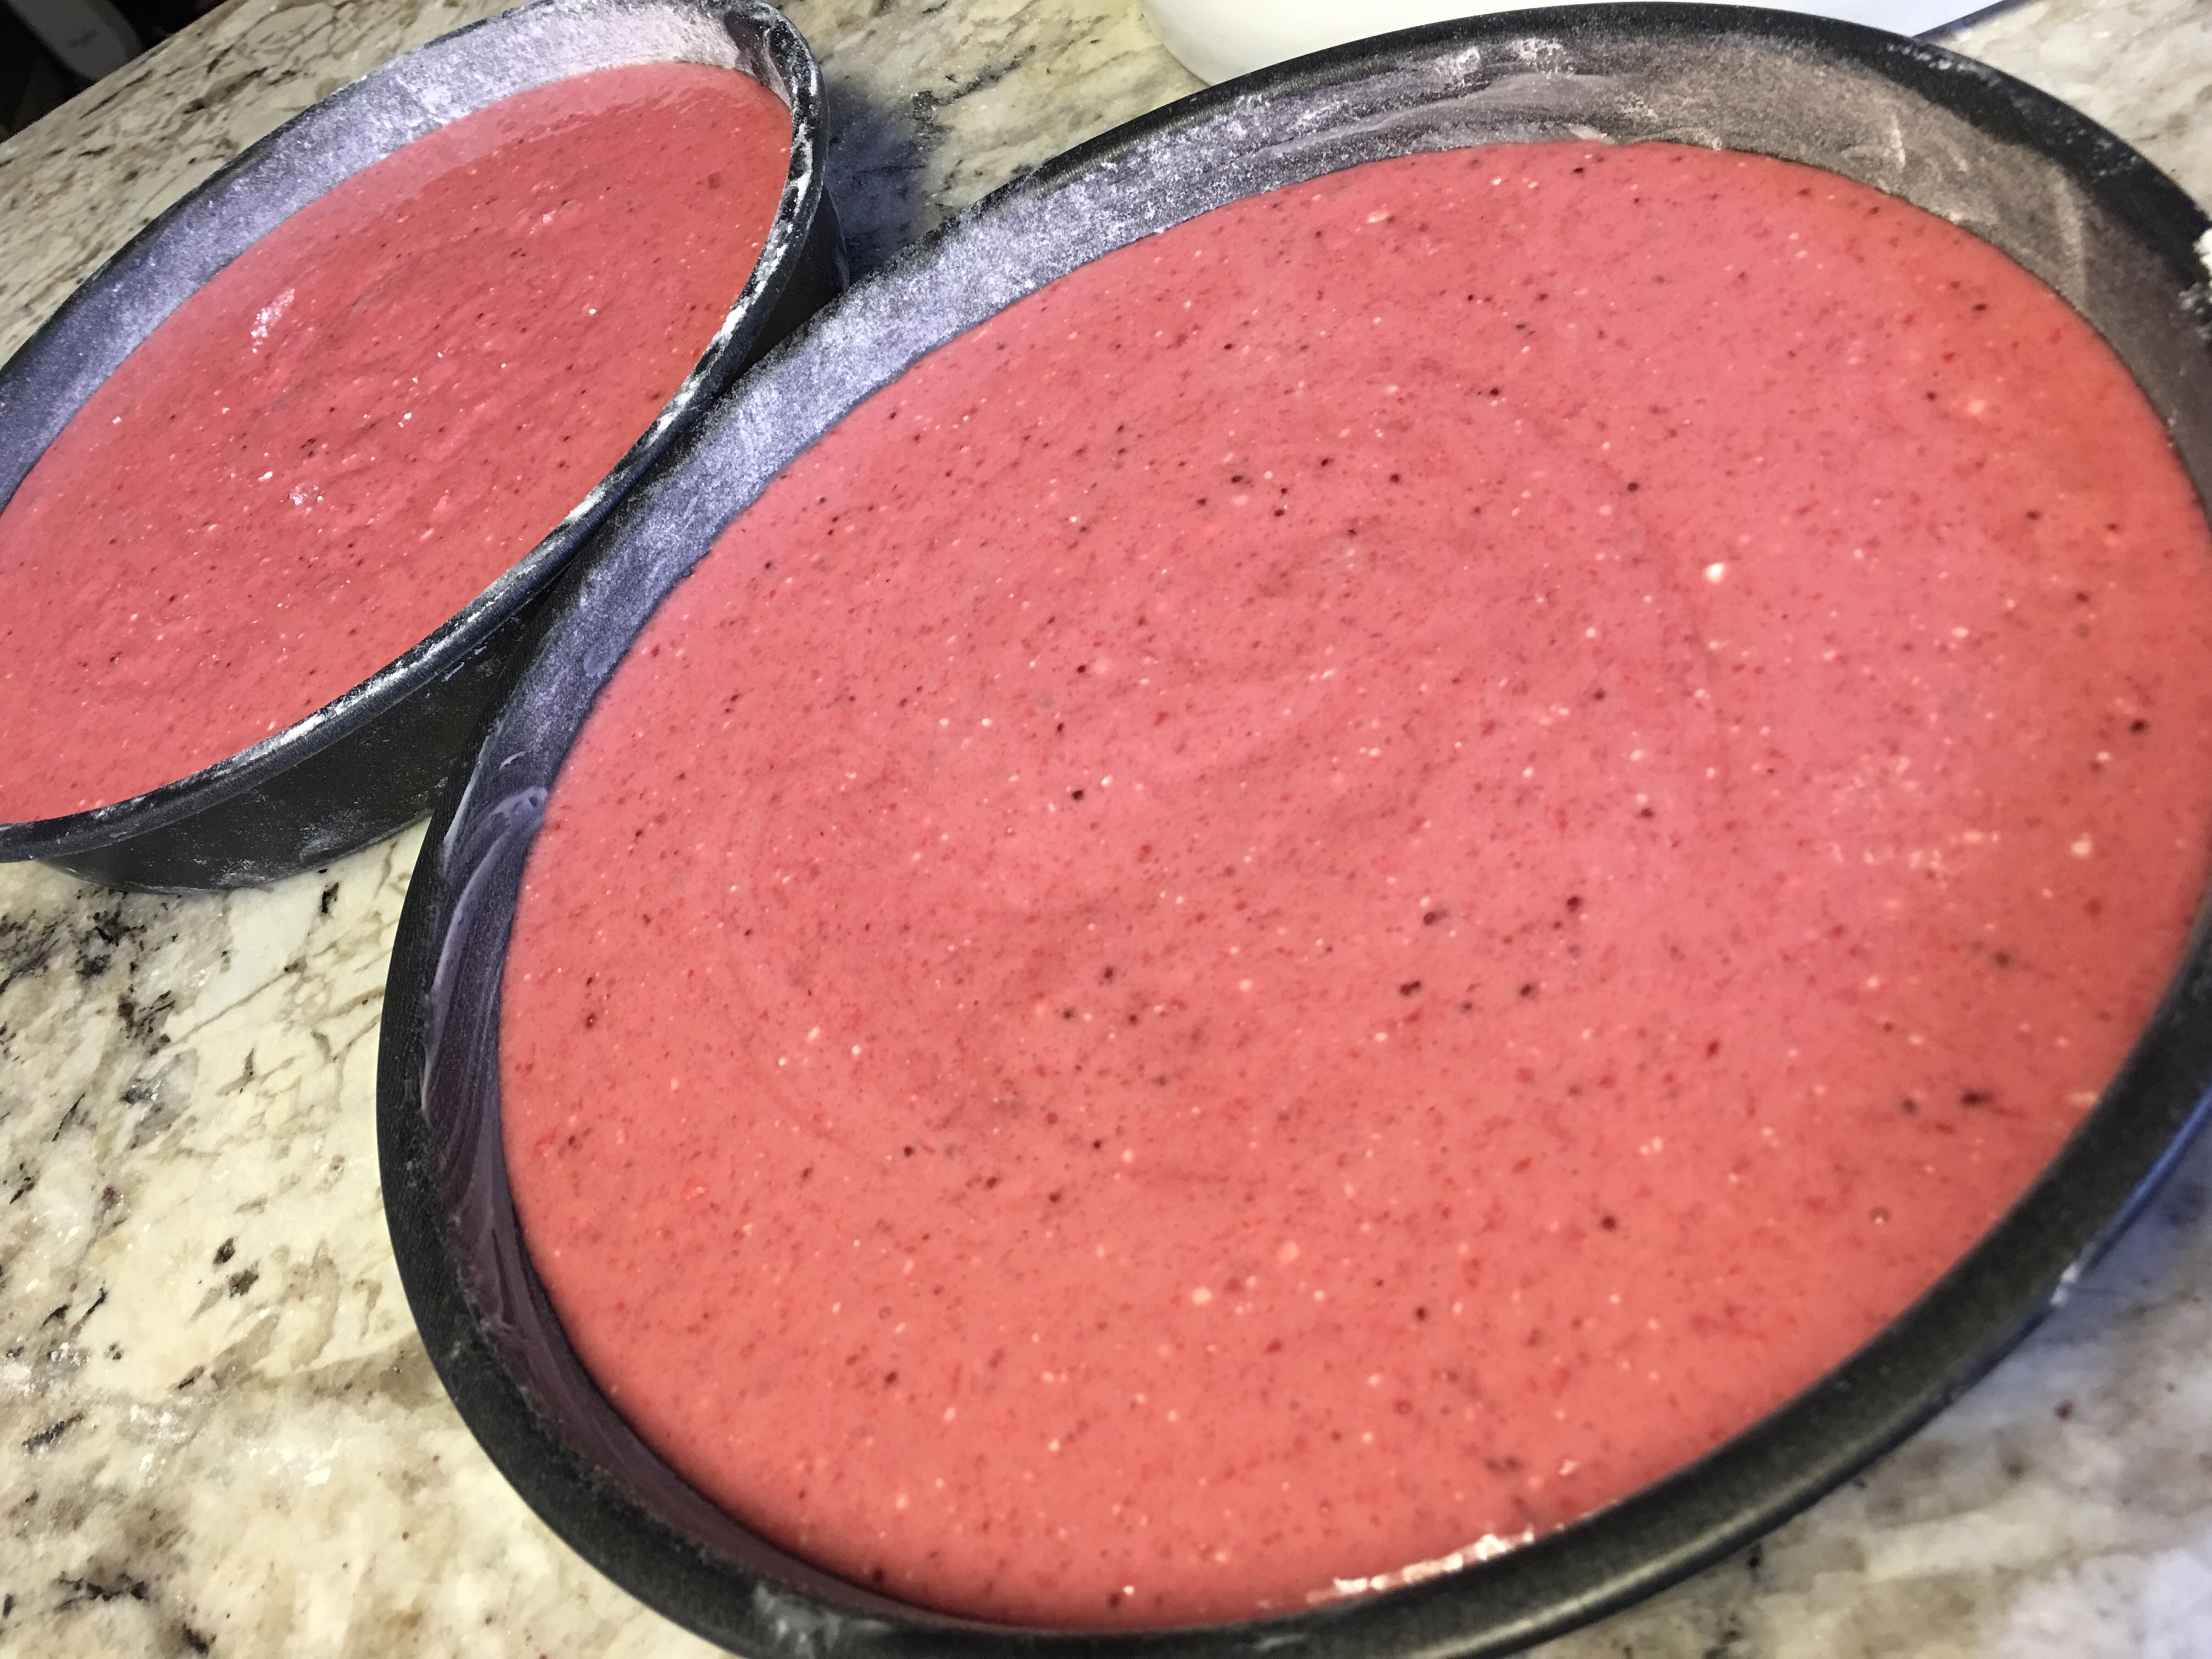
Separate cake batter evenly in two cake pans that have been lightly greased and floured.
This is a dense, moist cake that will need to be checked often for doneness.
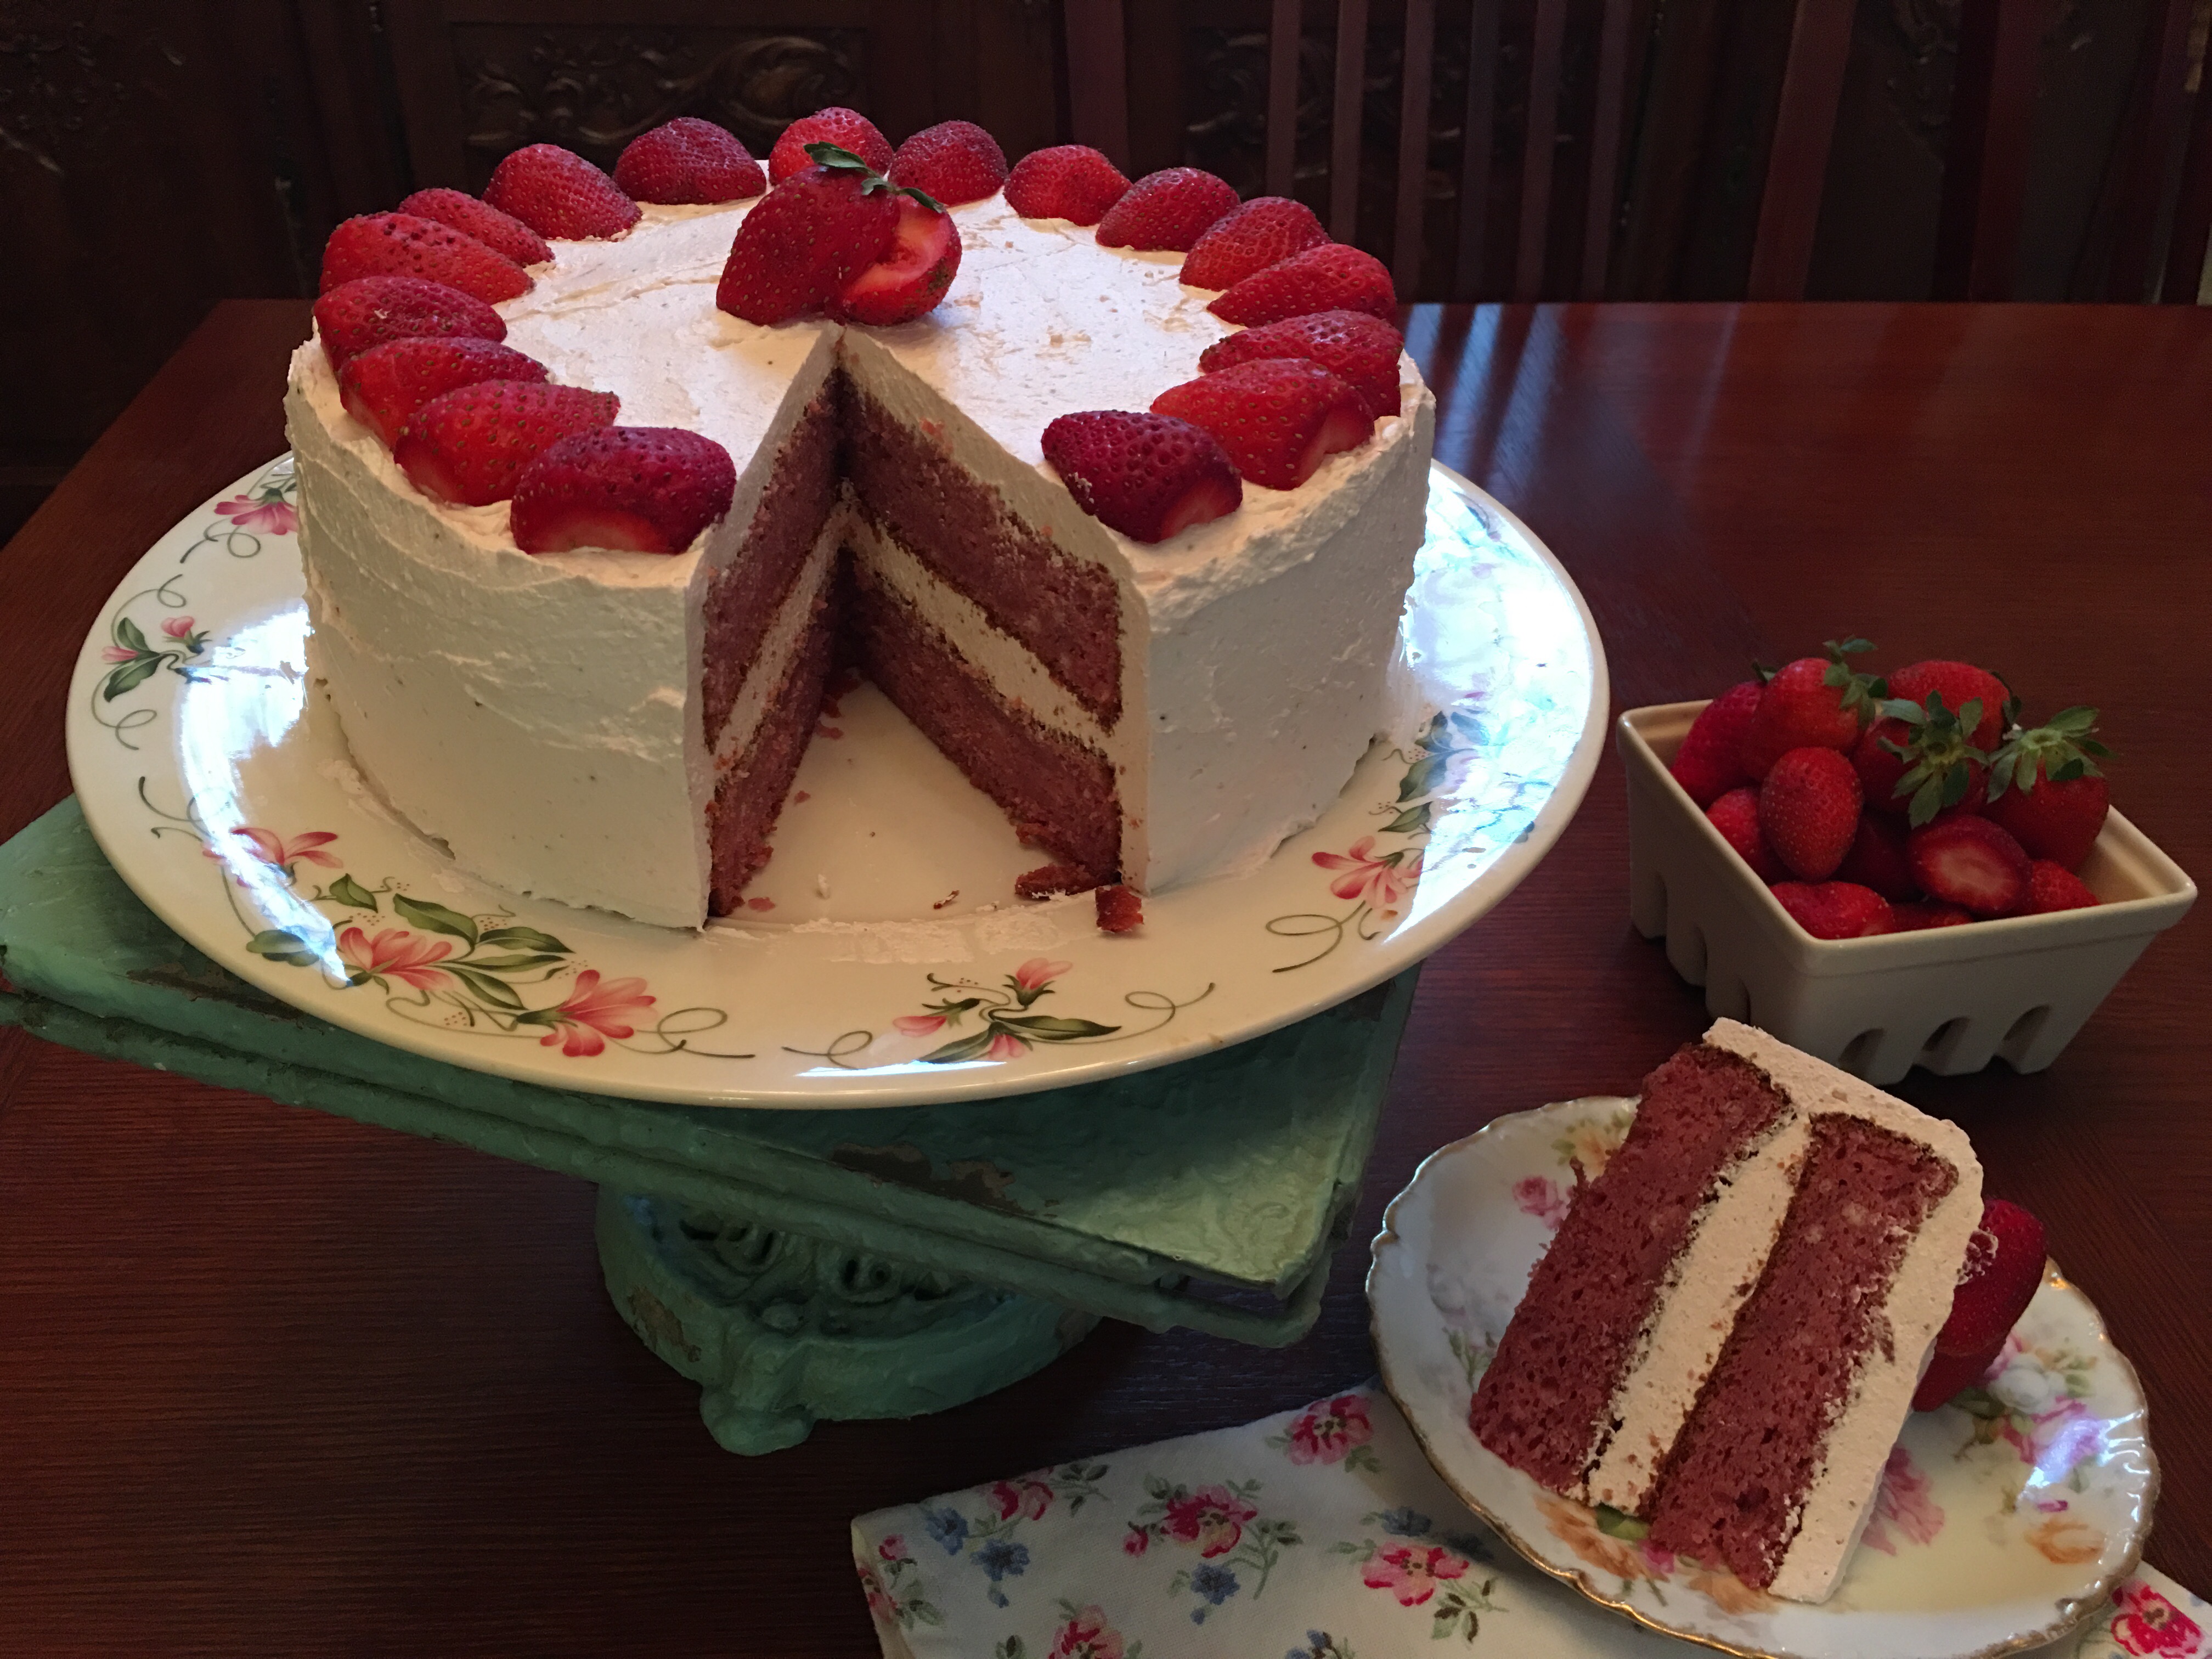
Simple Strawberry Cake
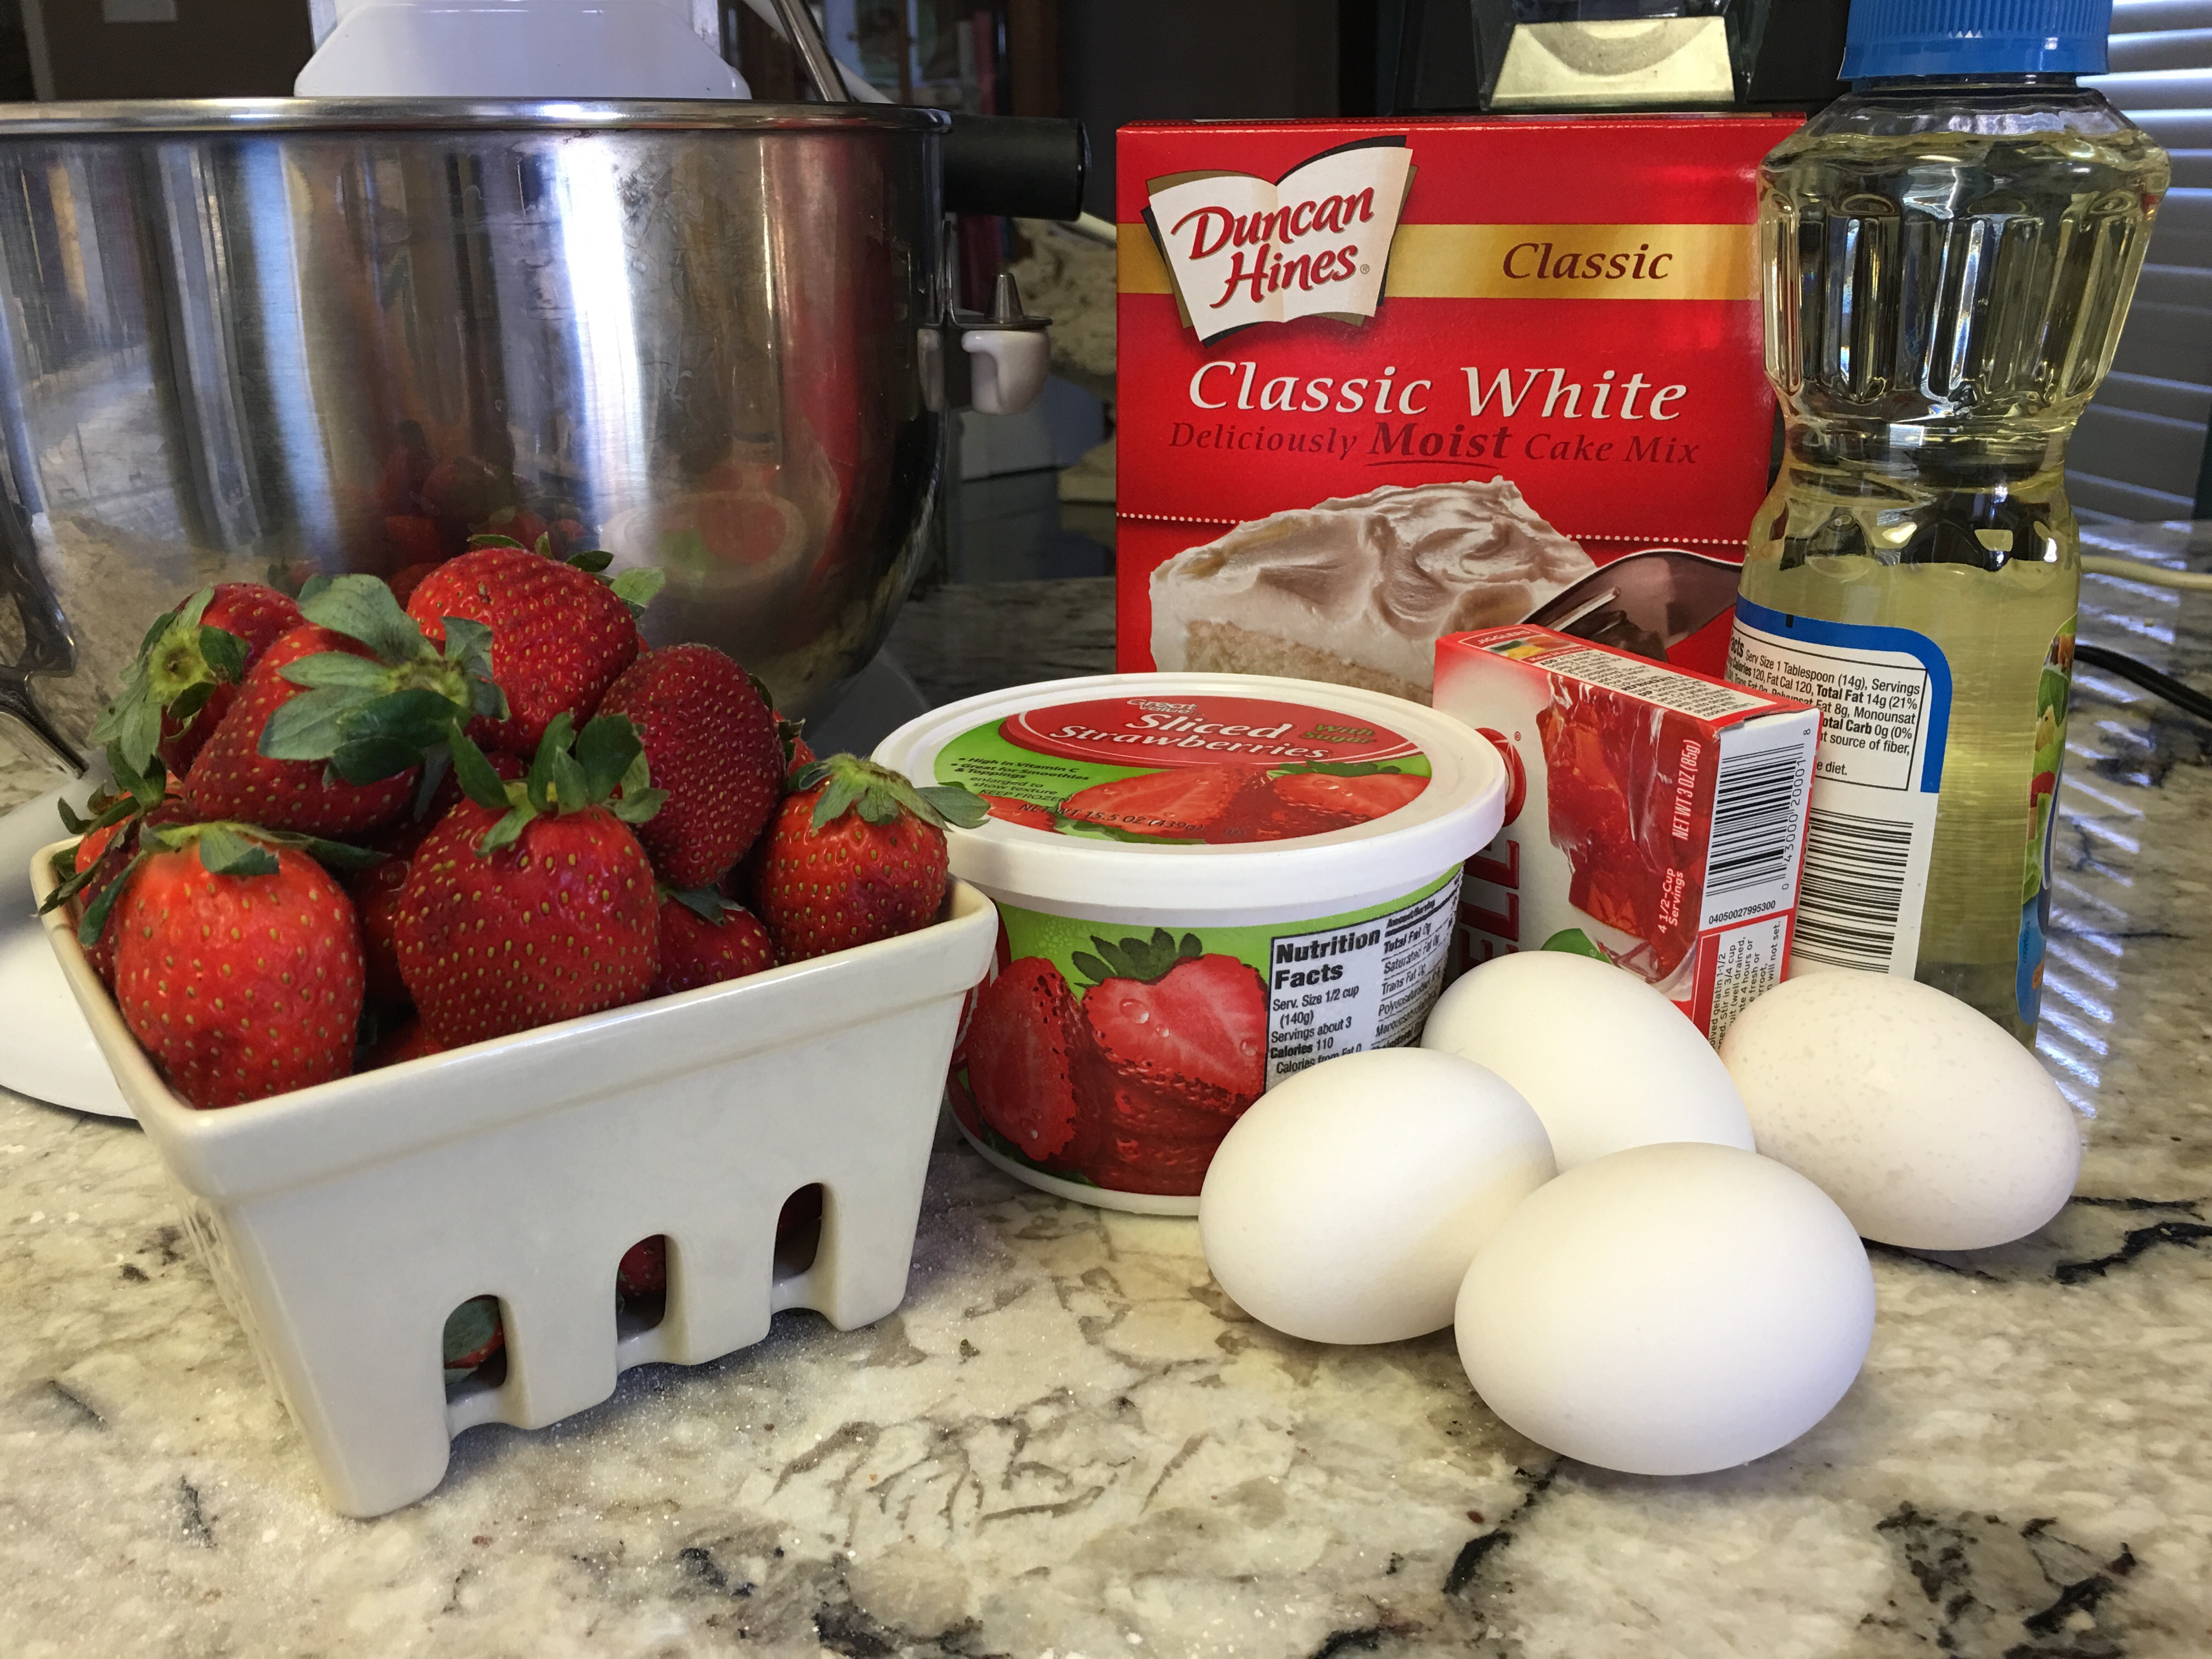
1 box of white cake mix
1 box of strawberry gelatin (3 oz instant)
1/2 cup vegetable oil
1/4 cup water
4 eggs
1 package frozen strawberries in syrup (around 15 oz)
Preheat oven to 325 degrees. Prepare two cake pans by lightly greasing and flouring them.
Purée strawberries in a blender or food processor. Or, just mash them with a fork. It will still be good!
Combine cake mix and gelatin in a large mixing bowl. Add oil, water, eggs and puréed strawberries. Mix at medium speed of an electric mixer until smooth. Pour evenly into prepared pans. Bake 35 minutes or until a wooden toothpick comes out clean. (Ovens vary, so check early and often) Let pans cool 10 minutes before inverting them on a wire rack to cool completely before frosting. For the quick, light frosting...
Purée fresh strawberries and add to Cool Whip in a medium mixing bowl.
Wisk the strawberries into the Cool Whip until smooth.
Strawberry Cool Whip Frosting
1 (16 oz) container Cool Whip
2/3 pint fresh strawberries (more for decoration if you’d like)
1 teaspoon sugar
Spoon Cool Whip into a medium mixing bowl.
In a blender (or magic bullet) purée the 2/3 pint fresh strawberries and sugar until smooth. Pour into cool whip and whip with a white wisk until completely blended. Frost cake with this mixture when completely cool. Decorate with fresh strawberries, if desired. Store cake in the refrigerator.
Wow! I can’t tell y’all how amazed and humbled we are about the awards and accolades we’ve been receiving lately concerning our restaurant! We wanted to be sure to Thank y’all!
Texas Highway Magazine, the official travel magazine of the state of Texas, named my pies third best in the state! What an honor!! I came in behind two cafes with a long tradition of having some of the best pies for longer than I’ve been alive! I’ll take being the newbie in this prestigious group. They also named The Coffee Shop Cafe one of the 40 Best Small Town Cafe’s in Texas! Crazy awesome, huh!?
Then, the restaurant was was given a readers choice award by Waco Today Magazine for having the best breakfast in Waco! Y’all, if you haven’t come out to The Coffee Shop Cafe for breakfast, you are really missing out! We serve breakfast all day and on weekend mornings we have a totally amazing breakfast buffet! All sorts of eggs, bacon, sausage, ham, pancakes, gravy, fruit and lots more. My favorite, migas, are on the buffet too. It’s over at 10:45 AM on Saturday and Sunday, so come early and hungry!
We want to Thank all our friends and customers for voting for us! Without you, we wouldn’t be where we are today!
We also had a really fun honor when the producers from HGTV’s show, Fixer Upper stopped by and filmed part of our decorations for their Christmas special featuring Chip and Joanna Gaines new bed and breakfast in town, Magnolia House. How fun to see a quick flash of our restaurant on their show! Of course, it went by so fast that if you hadn’t ever been to the restaurant before you would have never even known where it was filmed! Haha! Still super cool for Donald and I and for our regular customers that spotted us! We appreciate all of their business with us too. Lots of wonderful people!
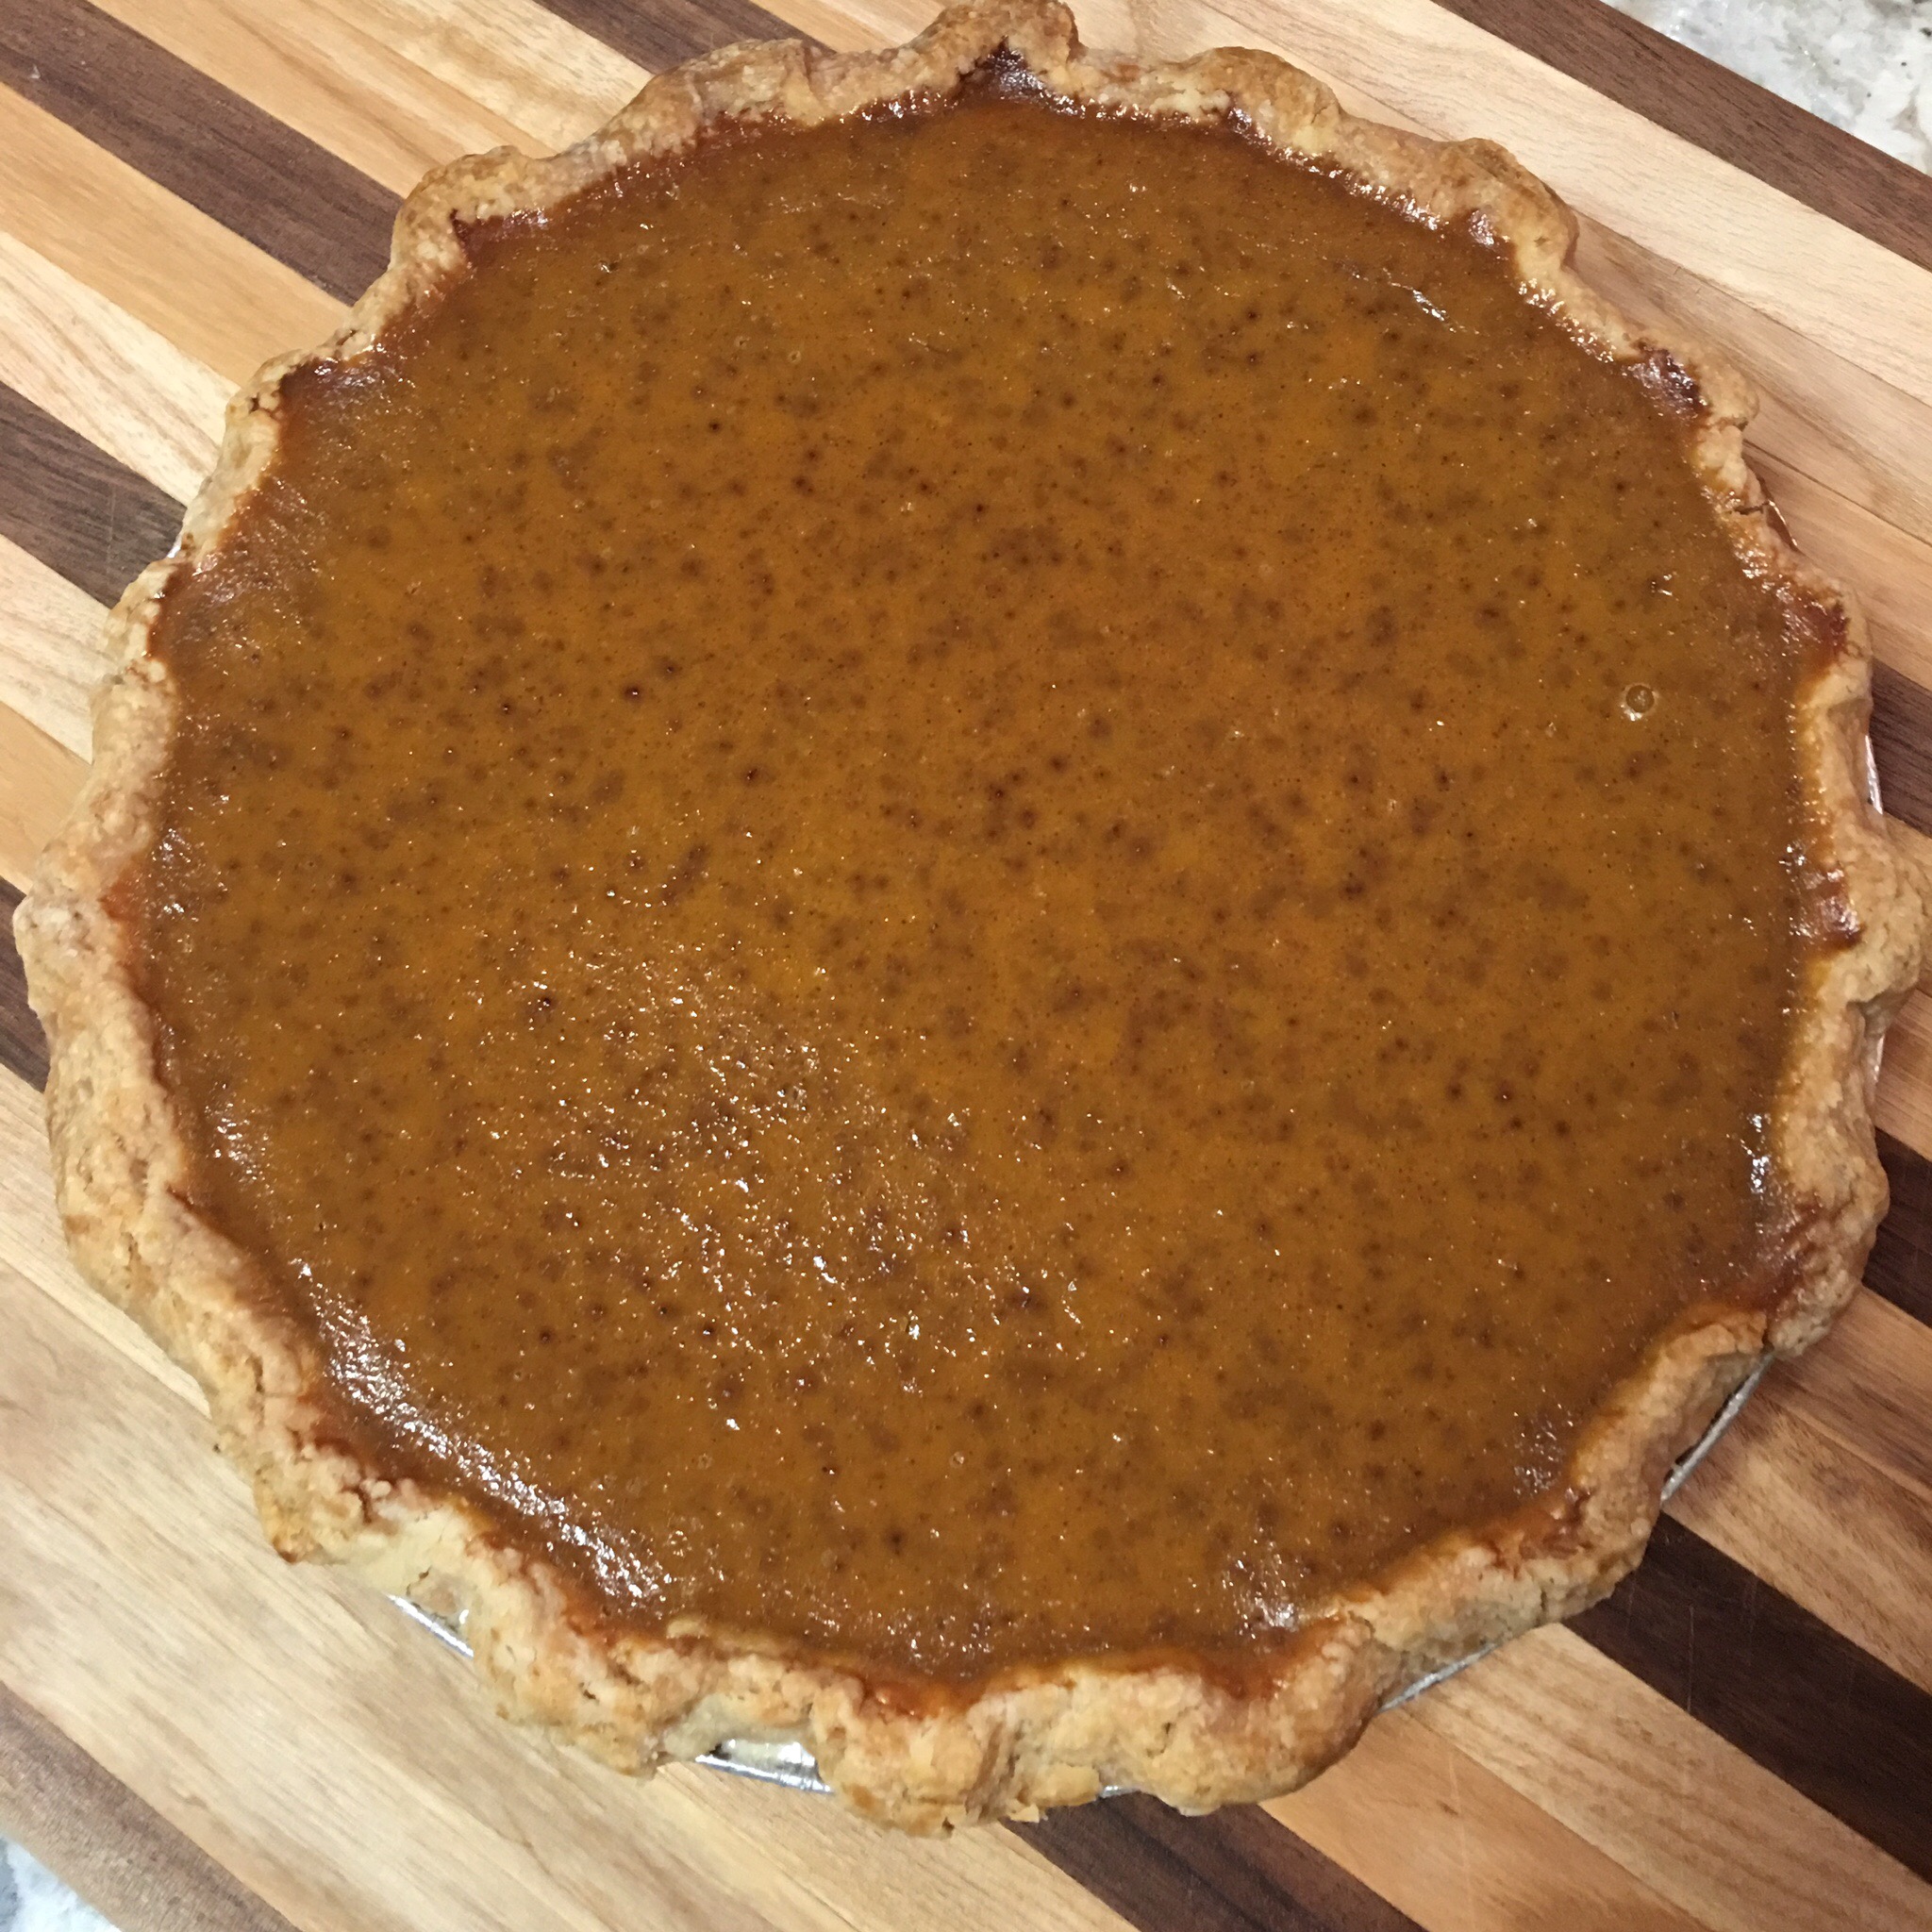
There’s just nothing better than Classic Pumpkin Pie
As the temperature drops, fall means pie to me. Pumpkin pie in particular! I’ll admit, it’s one of my weaknesses. It’s a vegetable, after all! Right?
Our forefathers may not have had this classic at the first Thanksgiving, but I don’t know many tables that it does not grace now a days!
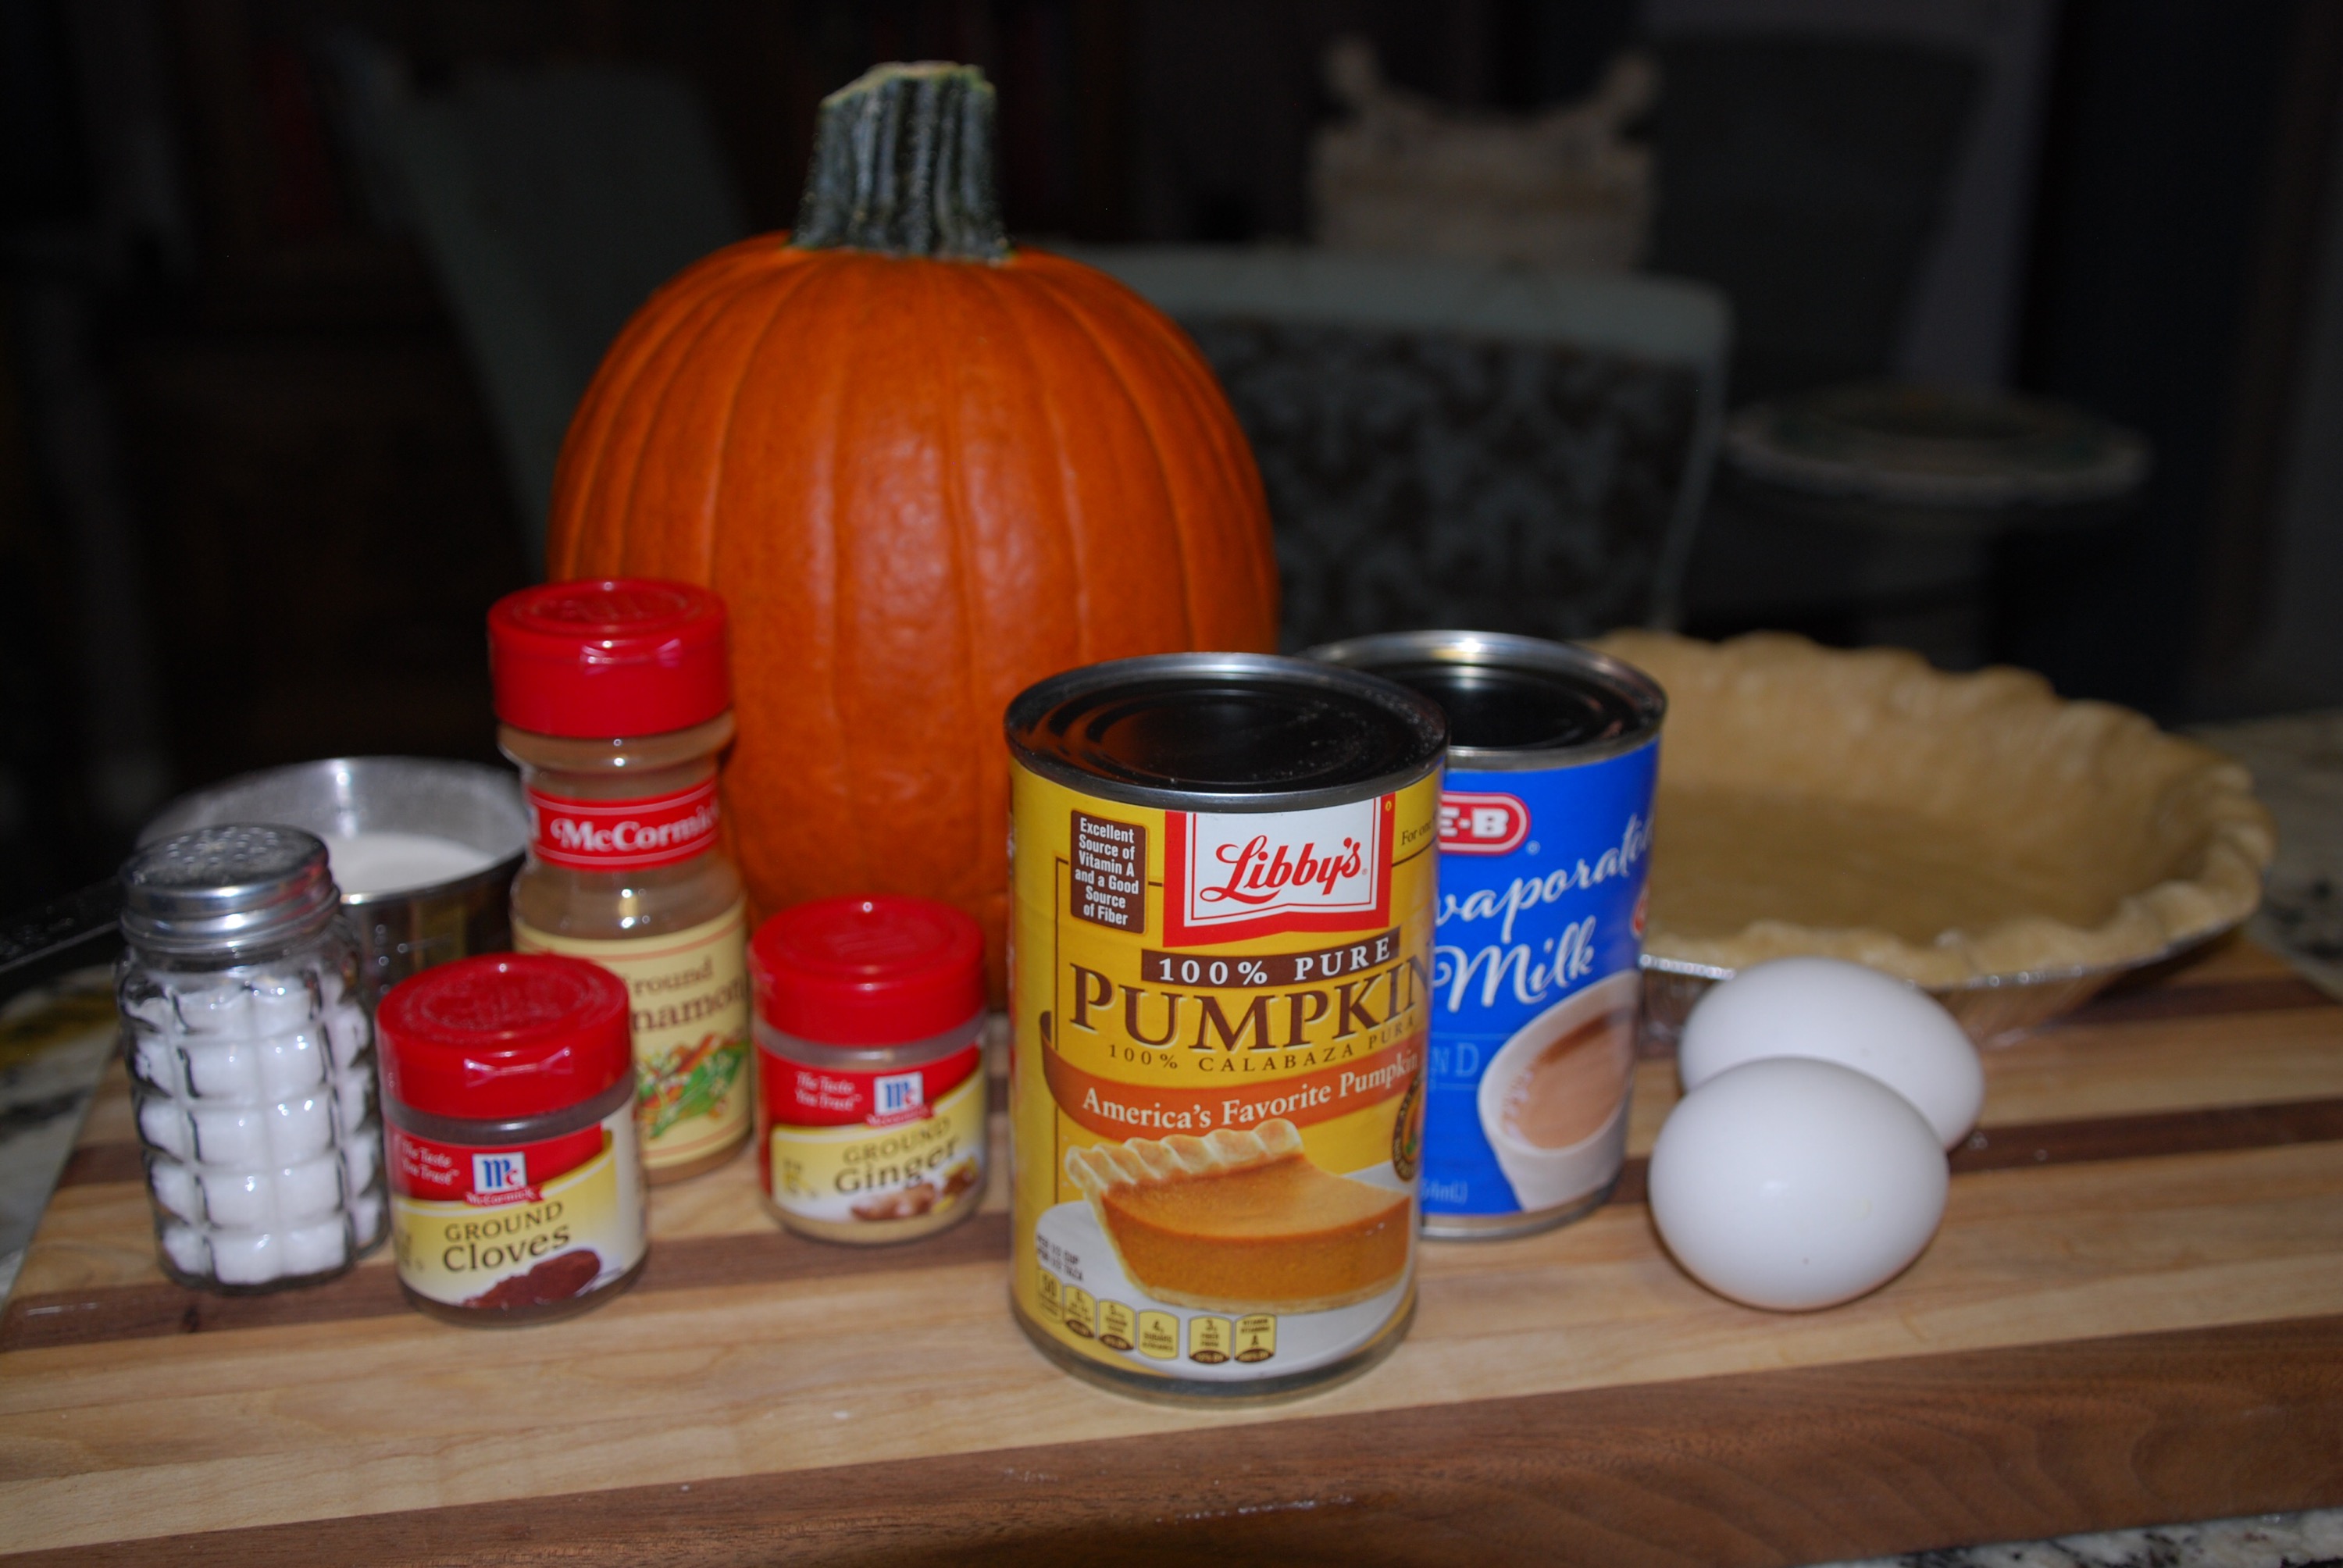
This recipe is adapted from the back of every can Libby’s 100% pure pumpkin. It’s the best I’ve ever eaten. There’s no reason to mess with a classic.
By the way, I only use Libby’s. Did you know that most other brands aren’t even real pumpkin? They are actually another type of squash. Check the label to be sure before you buy that store brand to be sure.
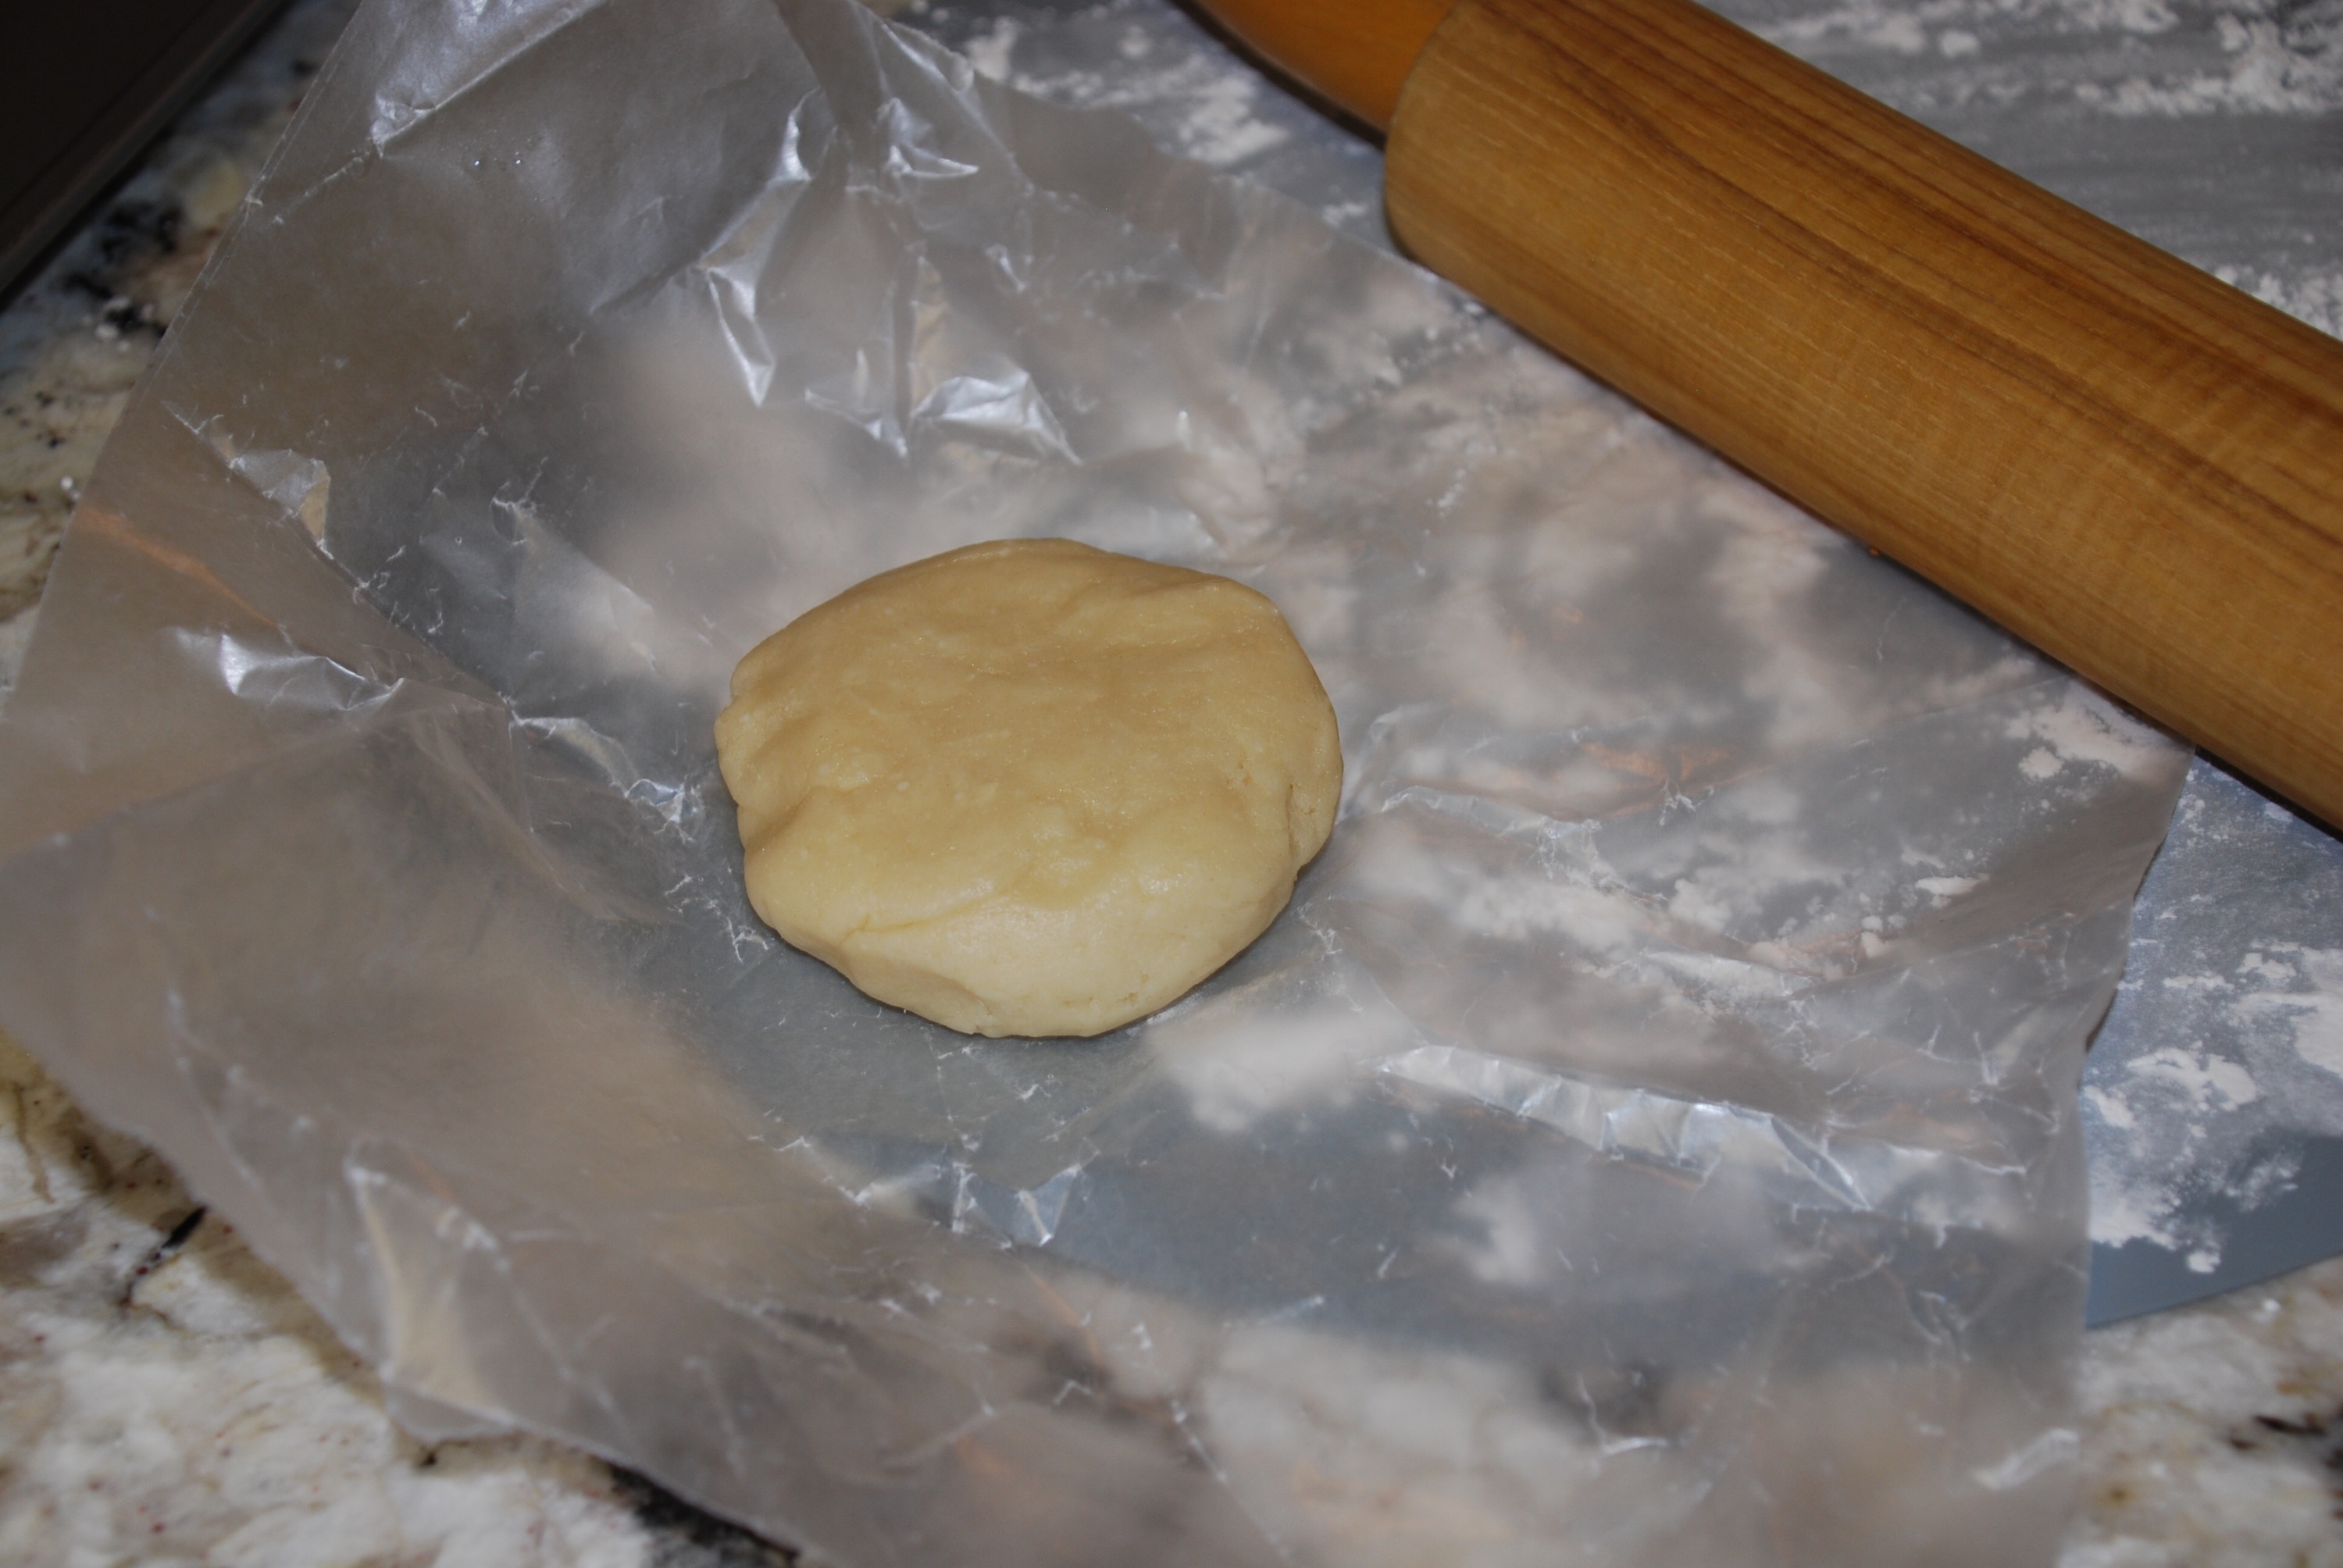
I’m sharing the easy pie crust recipe my Grandmother Duty taught me many years ago. I know, I should have added a few more ‘manys,’ but who’s counting anymore? Not me!
Really, it’s easy to make pie crust from scratch. Give it a try!
Pumpkin Pie
2/3 cup granulated sugar
1/2 teaspoon salt
1 teaspoon ground cinnamon
1/2 teaspoon ground ginger
1/4 teaspoon ground cloves
2 large eggs
1 can (15 oz) Libby’s 100% pure pumpkin
1 can (12 fl. oz) evaporated milk
1 unbaked deep dish pie crust
Heat oven to 425 degrees Fahrenheit.
In a small bowl mix sugar and spices together. Set aside.
In a large bowl, beat eggs until frothy. Add the can of pumpkin and sugar/spice mixture to eggs and stir until well blended. Shake can of evaporated vigorously before opening, then add to pumpkin mixture. Stir until well blended and smooth.
Pour custard mixture into pie crust.
Place on baking sheet and then into your preheated oven at 450 degrees for 15 minutes. Reduce heat to 350 degrees Fahrenheit and bake an additional 40-50 minutes. Remove from oven and let cool for at least two hours. Serve immediately or refrigerate.
My Grandmother’s Pie Crust
One crust for 9 inch pie
1 cup all purpose flour
1/2 teaspoon salt
1/3 cup shortening
3 tablespoons cold water
Sift flour and salt together. (I just use a wire whisk to blend and fluff the flour. The air mixed into the flour makes a lighter crust.)
Cut in shortening with a pastry blender, until size of small peas. Sprinkle water over mixture, while tossing quickly with fork, until particles stick together. Form into smooth ball.
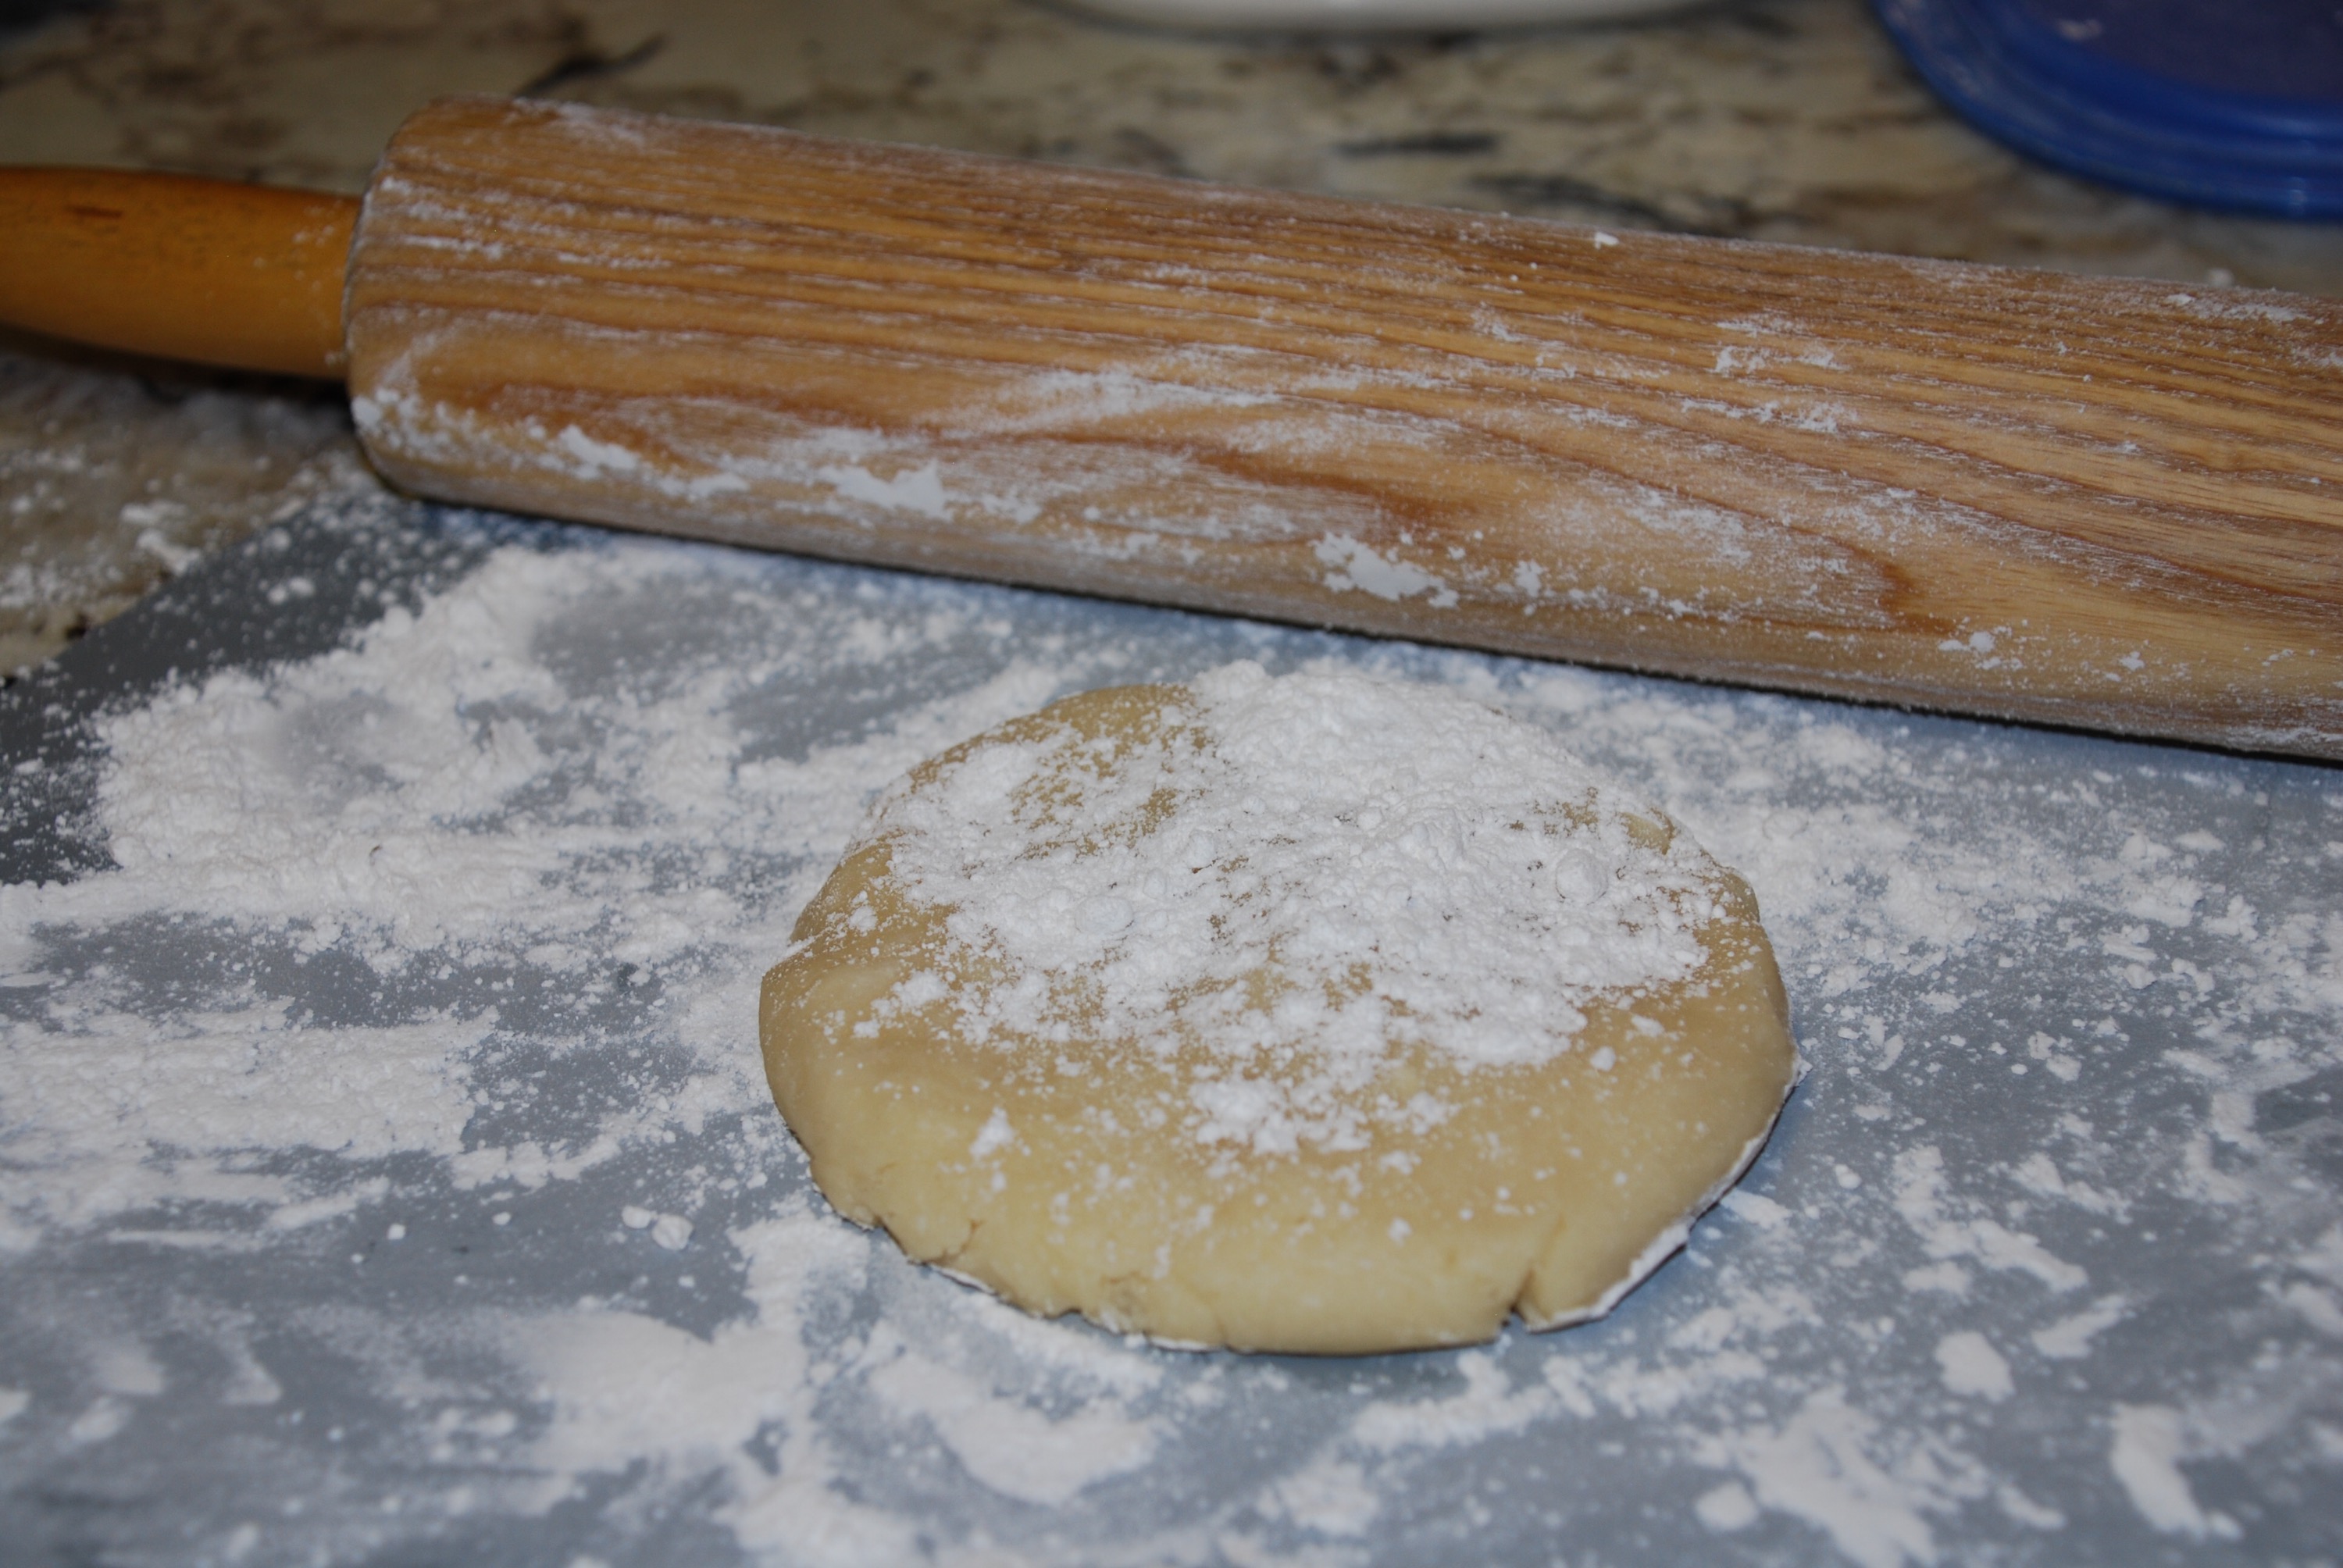
Foe ease in rolling out pastry, wrap dough in waxed paper and allow to chill in refrigerator. Lightly roll pastry into circle one inch larger than pie pan. Lift loosely into pie pan. Pat out air. Fold edges under and crimp.
Prick entire crust throughly before baking. This prevents bubbles and excess shrinkage. Bake in a pre-heated oven at 450 degrees Fahrenheit for about 12 minutes or until golden brown. Cool and fill.
A simple, fun way to dress up a pie is to use a shaped pastry cutter with a plunger that you lightly press into your rolled out crust. They come in lots of designs, but my favorites are leaves. Very versatile.
Just cut the shapes out with the plunger. Place on a non stick baking sheet and bake at 350 degrees Fahrenheit for about 15 minutes or until golden brown. When cooled, add them any way you’d like on top of your pumpkin pie. Be creative!
Is this one of your favorite fall pies too? Do you do something really creative with your pumpkin pie? Share your thoughts below and photos if you have them! I’d love to see yours!
When you make your final payment, just leave an open balance of $100.00 and we will take care of it! Super Simple! Venice is a city not to be missed! One of my favorite places in the world!
Go Ahead is working on our group phone/tablet site so our tour consultant, Emily, told me to pass along her direct line in case anyone would like any information at all since it still isn’t working. Her number is 617 6191516 and you can give her my name, Valerie Citrano or our group tour number 68796229. The site seems to be working on my laptop and desk top computer. Hope you are able to go with us! It will be a lot of fun!
You are invited!
We will be holding a short meeting this Saturday, October 17, 2015 at our restaurant, The Coffee Shop Cafe in McGregor, Texas to talk about our trip to Italy next May! It will begin at 2:00 and last till about 3:30.
If you can’t make it this Saturday, you can still sign up to go with us! It does not matter where in the world you live, you can meet up and join our small group! Learn more about out trip right here on my blog where you can also click over to our Go Ahead Tours web page
I am so excited to be able to share Italy with you! It’s an experience that you won’t want to miss!
A side trip I’d love to take you on to Florence if you’d like.
Our Italy 2016 group tour web site where you can view the itinerary, the base price and choose the options you’d like to add on like the extension in Venice, extra excursions and to price your airfare from your nearest airport. Just click here and begin dreaming of Italy: Go Ahead Tours: Coffee Shop Travel Club
Turino is our first stop on our Food & Wine: Northern Italy and the Italian Riviera small group tour in May. We will be treated to a tour of this beautiful city and still have plenty of time to explore on our own.
Many people say that Turin matches the beauty of Paris. Even so, it hadn’t really been on my list of places to visit, that is until I read a press release from the Holy See’s office in the Vatican.
The Cathedral of St. John the Baptist where the Holy Shroud is kept in Turin, Italy. Photo copyright Valerie Duty CitranoIn 2010 there was a special exhibition of the Shroud of Turin. This was extremely unusual. The shroud is historically only brought out for showing once every ten years and even then it is very difficult to get into the Cathedral of St. John the Baptist to see it.
The shroud on display insideThe Cathedral of St. John the Baptist where in Turin, Italy. Photo copyright Valerie Duty CitranoGrowing up and through the years, I had read several books about the shroud, the Templar Priests and the scientific communities fascination with studying this 14 foot piece of cloth whom some believe covered the body of Jesus Christ after his crucifixion. I’ll admit, it absolutely fascinates me too. Is it real or is it one of the best forgeries ever known to man? Either way, I wanted to see it for myself.
Pope Benedict XVI mingling with the crowd in Turin, Italy. Photo copyright Valerie Duty CitranoPope Benedict XVI was set to go to Turin and view the shroud along with holding a mass in the city’s center. I had applied for media credentials from the Vatican several years earlier, before our first trip to Rome, and had photographed Pope John Paul II. So, I gave the press office a call and secured credentials and passes for myself and my husband to to go to the shroud’s limited viewing. The same day that I had read that press release, I had credentials, passes to see the shroud and had booked our flights to go to Turin, Italy!!!
That’s how we ended up spending a week in Italy’s ‘Paris.’ Beautiful Turino.
Beautiful architecture
The city center, with its beautiful buildings and statues were enchanting. Walking there in the evenings felt like walking through the movie, The Da Vinci Code. I expected to run into Tom Hanks around every corner.
This trip, I really want to take a tour of the palace. There were just too many pilgrims in town on our last visit. The line was terribly long! Glad we will have another chance to see Turin again!
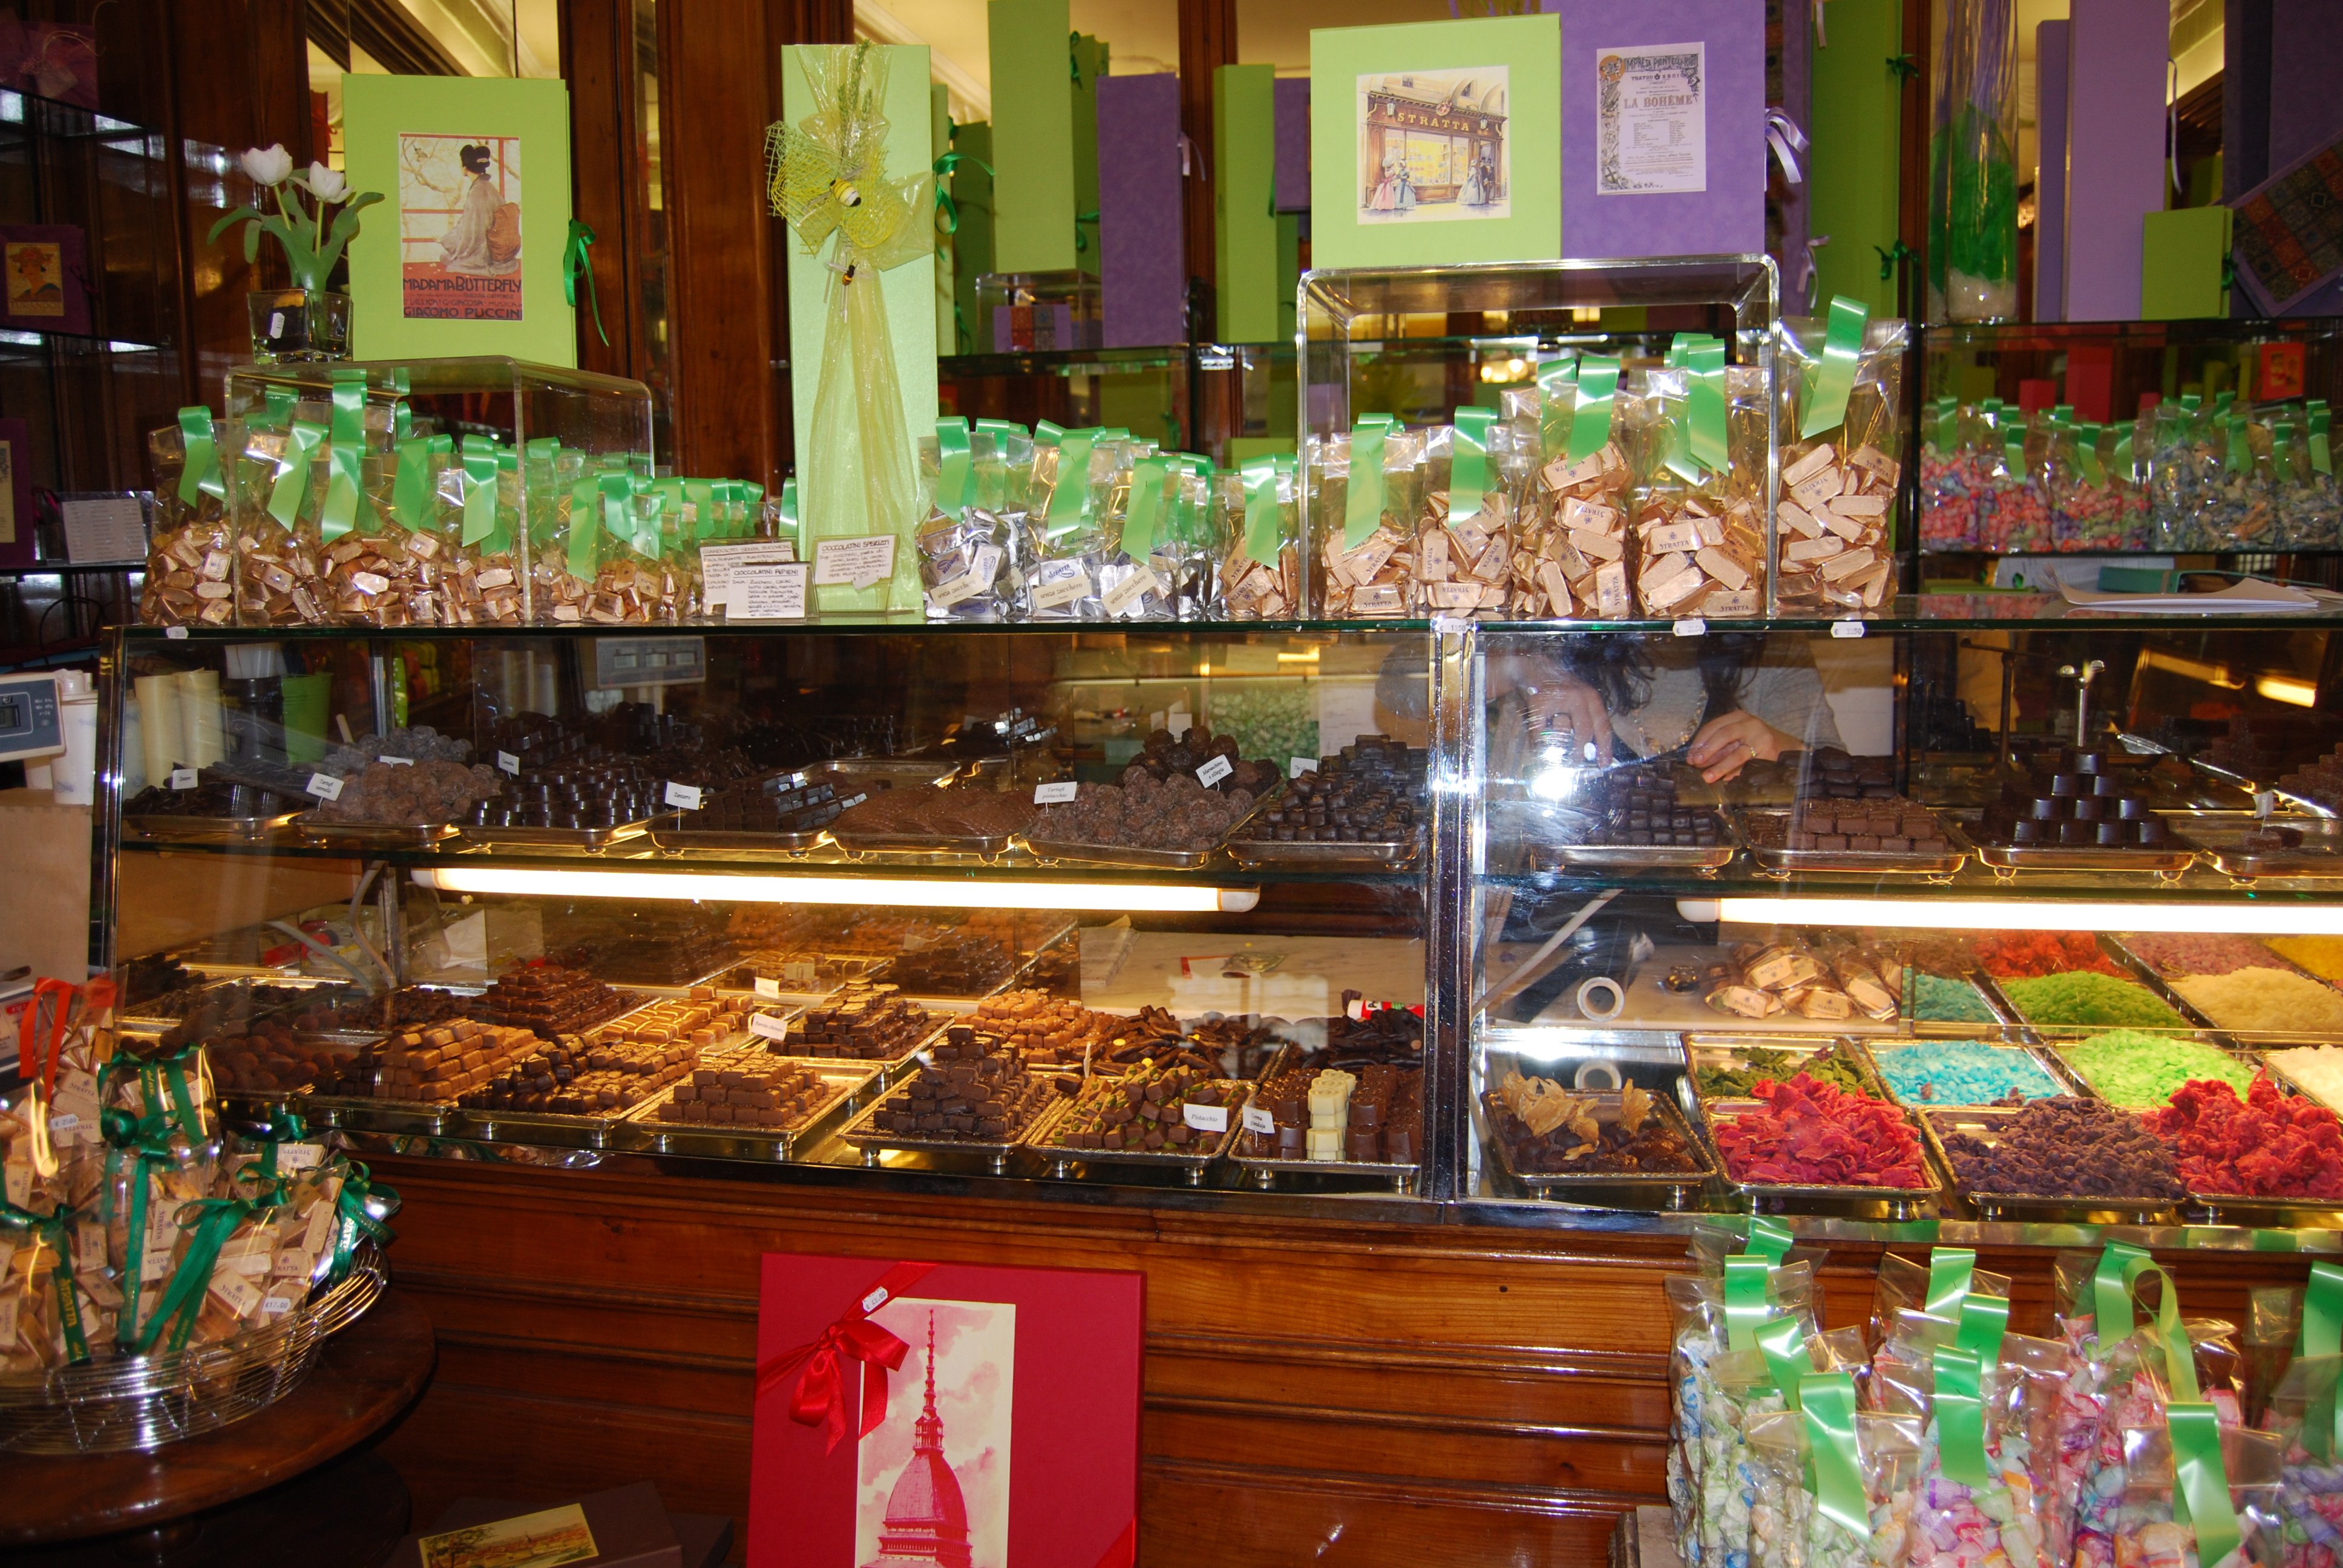
One of the many chocolate shops in Turin. Italy
A Chocoholic’s dream
At breakfast our first morning at our hotel, we chatted with a couple who were there not to see the Pope or the shroud. They had come from England for Turin’s famous chocolate. Oh my goodness! Yes, chocolate! Come to find out, there were shops after shops with lovely, delicious CHOCOLATES! And they happily give out samples on small silver trays!
Donald never met a chocolate he didn’t like! This was heaven on earth. There was also the thickest hot chocolate that we had ever drank and come to find out, Nutella is manufactured in Turin!
So much more
Turin was the home of the winter Olympics in 2006, is the home of Fiat and Alfa Romero Automobiles and is situated near the Alps. It is only a 40 minute train ride from Milan.
To learn more about Turin, it’s history and architecture, visit Wikipedia https://en.m.wikipedia.org/wiki/Turin
So now we are going back to the jewel that is Turin and I couldn’t be happier! More on our trip to Italy in May of 2016. Booking will be closing soon!!
When we were in Cancun recently, I got up really early {EEEK!} on our first morning there to watch the sunrise over the ocean. But alas, there were way too many dark clouds completely covering the sky. ⛅️ bummer!
Experiencing a beautiful sunrise over the ocean may have been a total bust, but it was still an amazing morning!! God is good like that! Sometimes we have an idea of what we want or expect, but he has a different plan in mind. That was this morning for me.
Tracking turtles
As I walked along the beach, I started noticing tracks in the beach coming from the sea. I quickly realized that they were from sea turtles coming up to lay their eggs!!! As I walked along, I began counting and there had been five mamas that had laid their eggs just in front of our resort during the night.
Sea turtle tracks leading to the beach where a female laid her eggs, then returned to the ocean.As many times that we have been to our shared condo in Cancun, I had never noticed this before. Just how was that possible? I photographed the holes and tracks with my iPhone. You can see the intention from their tails dragging in the sand and where their flippers had moved along both sides. Follow the tracks and they lead you to the massive holes where the eggs were laid. As you follow their path then you can see where they went back into the ocean.
The green turtles that made these tracks are endangered and can weigh 500 – 1000 pounds! They are huge! Our resort has a team that collect the eggs and move them to a corral that is secure where the eggs hatch and then they are released at dusk into the ocean so that they have a better chance of survival. Amazingly, these turtles tend to go back to the place they hatched to lay their eggs! Is that crazy or what?
A female sea turtle laying her eggs on a Cancun beach.Our turtle adventures continued literally every day that we were in Cancun. A couple of evenings I went down to the beach in the middle of the night to try to see if I could actually spot a mama turtle laying her eggs. What a surprise when I actually saw not one, but two mamas on the beach one evening! It was amazing watching the process!
Hatchlings
I’d never seen turtles hatching before either and had that chance by accident as well. Crazy thing… Twice during our week’s stay! One afternoon we were taking a stroll in the sand and a gentleman showed us a pile of eggs laying on top of a mound of seaweed. There had been a bad storm the night before and the thought was that the mama was disoriented.
Sea turtle eggs found on the beach in Cancun.A guard was called over and as he was collecting the eggs, we noticed a hatchling that had gotten caught up in the seaweed as well. There was a lot of seaweed this year. I don’t know how any of the babies hatching could make it through all of it. It was like a huge barrier.
Thats me holding a newly hatched sea turtle found on the beach in Cancun! what a wonderful experience!If your taking a walk along the white sand beach, be sure to watch where you are stepping!! I found hatchlings that didn’t make it out to sea on a couple of mornings too. Five babies one morning were sure to be breakfast for some very interested birds if I had not spotted them and taken them to a guard. Poor things. They were safe though and were released that evening.
Hatchling turtle releases along the Cancun beach
We participated in a baby turtle release at our resort one evening. We did this last year too. I’ve learned that most Cancun resorts participate in the turtle conservation program by collecting eggs, protecting them in corrals and then releasing the hatchlings into the ocean.
A safe corral for the sea turtle eggs collected along the white sand beach in Cancun Mexico at the Royal Sands Resort.Many resorts allow their guests to witness and participate in the release. No flash photos or bright lights are allowed during the release as the light will disorient the hatchlings where they may not make it out far enough into the sea. Instead they may end up back on the beach where they may become a bird’s dinner. Geez! No one wants that to happen!
If you’d like to participate in a release, just ask at your resort or hotels front desk. If your walking along the beach at 8:00 in the evening and you happen to run across a bunch of people lined up along the water line, you can just about bet that there will be a release going on. Just fall into line and join in the fun! But no flash, please!
Best time for turtles
Seven of the eight species of endangered sea turtles nest along the beaches in Mexico. Four of the species nest on the Cancun beaches. They are loggerhead, leatherback, white (green) and hawksbill.
A female turtle laying her eggs in the middle of the night on the beach in Cancun.The female turtles come ashore to nest between May and October to lay their eggs in the white sands along the Cancun shoreline. It’s a wonderful thing to watch, just be sure to stand back and don’t mess with any female. If she feels that it isn’t safe to lay her eggs, she will return to the ocean rather than nest.
Once the eggs hatch, the baby sea turtles are set to be released from July thru October.
Our regular week at our condo at Royal Resorts is the beginning of September. Perfect time of the year for both eggs to be laid and hatchlings to be born. I intend to learn more about sea turtles before we return next year. Hopefully, our grandchildren will be able to go with us too! I’m sure any child would love to see all the baby turtles!
Newly hatched sea turtle heading to the ocean on the beach in Cancun , Mexico
Lessons learned from the turtles
God has a plan for every living being He placed on this Earth. When I see and learn more about his creatures, it brings me closer to Him. Think about nature all around you. How can anyone not believe in Him? He has a plan for your life too! Just like the turtles 🌴🐢🐢🐢🐢🐢🐢🐢🐢🐢
The eggs we watched the mama lay are in this mound of sand. they were moved to a corral, counted and marked.Many thanks to the most patient young man whom I met on the beach who stayed with me overnight so that I could watch the two female sea turtles lay their eggs. His name is Junior and is a guard at a neighboring resort. He was also responsible for collecting and counting her eggs, moving them to a safe corral and marking the new nest. Hoping these eggs hatch and make their way to the ocean safely! Maybe we will see them on the beach again one day!
Have you experienced Sea Turtles laying their eggs or a hatchling release? Tell us about it!
the sign in front of the old Big Red offices still stands on LaSalle Ave in Waco, Texas
A lot of people know that Dr Pepper was invented right here in Waco, but did you know that Big Red soda was born here too? Big Red was invented in 1937 and has been made in Waco ever since. One Texas city with two bottling companies born here. Pretty cool, I think!! Big Red isn’t sold as widely as Dr Pepper, but it’s fans are just as passionate. I’ve actually had to bring along six-packs to friends who didn’t live in a states that it was sold in. I’ve heard of some Texans stationed overseas in the military who have loved ones ship them a supply on a regular basis. Now that’s love!
The old Big Red Distribiter building on LaSalle Ave in Waco, Texas
Living here in Waco, we grew up with Big Red. We use it in baking and we enjoyed lots of it poured over vanilla ice cream to make floats. During the hot summer months, my Aunt Willie would bring her hand crank ice cream machine over to my grandmother’s house and she would make us all Big Red Ice Cream. Uncle Roy seemed to always be the one sitting on the back steps cranking that machine while he allowed us kids to add the ice and salt as it melted. Uncle Roy would tell us stories of Tom Sawyer and his life as a young boy growing up in what was a foreign state to us. He would let us crank from time to time, but none of us hung in that long. Dang, that was hard work!! Bless his heart! Looking back now, I really appreciate him!
Big Red soda bottled in Waco, Texas
When all that cranking was done, and the lid was finally opened, what came out was MAGICAL!! Creamy, fruity, magic! Better than a float any day! Big Red ice cream!
Yummy, refreshing Big Red ice cream
Waco’s Big Red Ice Cream
1 can sweetened condensed milk
1/2 pint of whipping cream
1 – 10 ounce package of frozen strawberries
1 – 2 liter bottle of Big Red (64 ounces)
You will also need a bag of ice and rock salt for your ice cream freezer.
Mix together the sweetened condensed milk, whipping cream and partially defrosted strawberries in a medium bowl. Once combined, pour into standard size ice cream freezer cylinder. Place cylinder in outer bucket of machine. Fill cylinder with Big Red. Insert paddle, cover cylinder and attach motor. Fill outer bucket with ice, layering along the way with the rock salt, repeating till ice is at the top of inner cylinder. Freeze according to manufacturers directions.
Makes about 3 quarts. This ice cream is yummy right out of the ice cream maker or you can freeze and serve later. Store leftovers in freezer safe container.
Use any soda and fruit combination to make delicious ice cream!
You can use the basic part of this recipe and change up the soda and frozen fruit to customize it to any flavor combinations you wish. Just use your imagination! There are so many speciality sodas available now that you can just go crazy! My Aunt Willie would sometimes use Orange Crush and frozen pineapple. It was really good too! Here’s a few other variations you might like to try:
Ginger ale with pineapple
Cream soda with cherries
Cherry soda with dark cherries
Ginger ale with peaches
Pomegranate Italian soda and blueberries
Be sure to share what ice cream you’re planning on making!
Have you had Big Red ice cream before? Tell us your story.
Super easy and quick Italian Chicken Tenders and Baked Tomatoes
Aren’t we all looking for quick and healthy meals to place on our table on week nights? Especially on school nights. Too much going on to slave over a hot stove.
My kids favorites seemed to always include chicken tenders or pizza. This super quick combo of tenders, Italian seasonings and fresh tomatoes should be a sure hit. The baked tomatoes are a lot like having pizza but without the guilt of a heavy crust.
The best part is that this meal, with prep and baking time, should take less than 45 minutes from start to finish! Plenty of time left for homework, sports and family time! Add a salad and you have a complete meal.
The kids will love to help with this one too. What kiddo doesn’t love squishing stuff around in a ziplock bag? When they help you in the kitchen, you’ve got a better chance of them eating something healthy without the dreaded, “Yucky!”
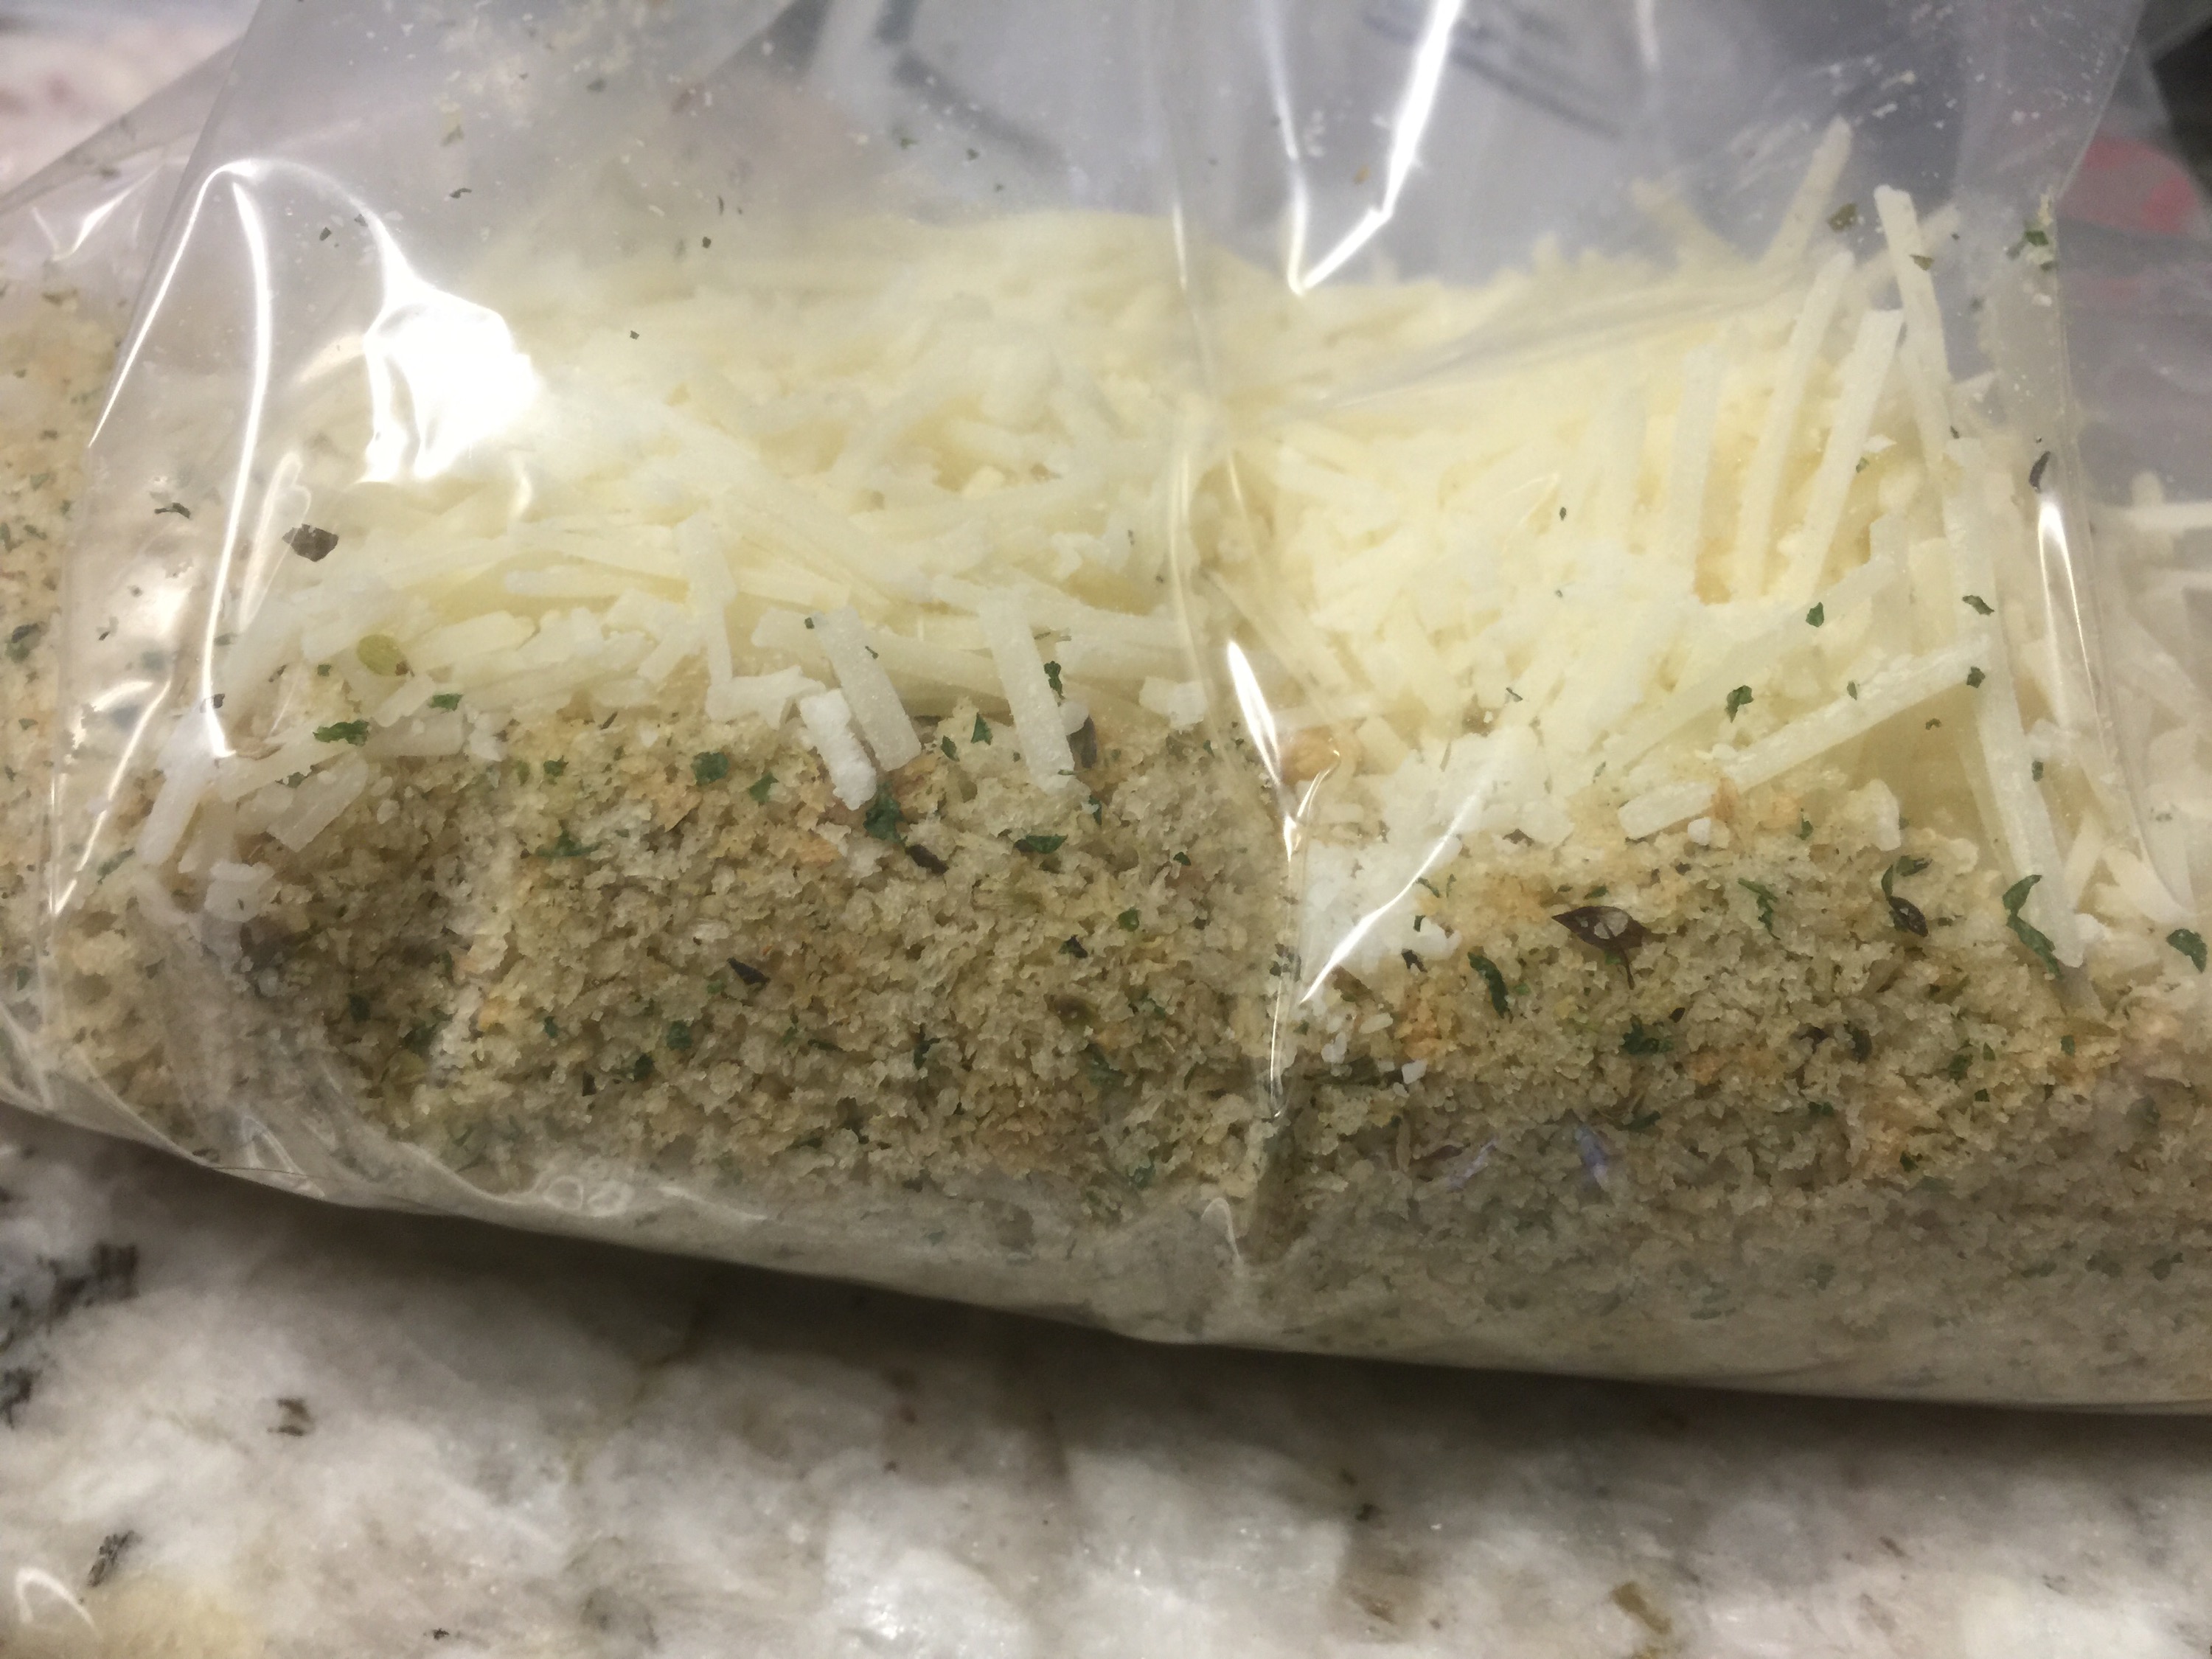
What kid wouldn’t like smushing chicken and mayo around in a zippy bag?
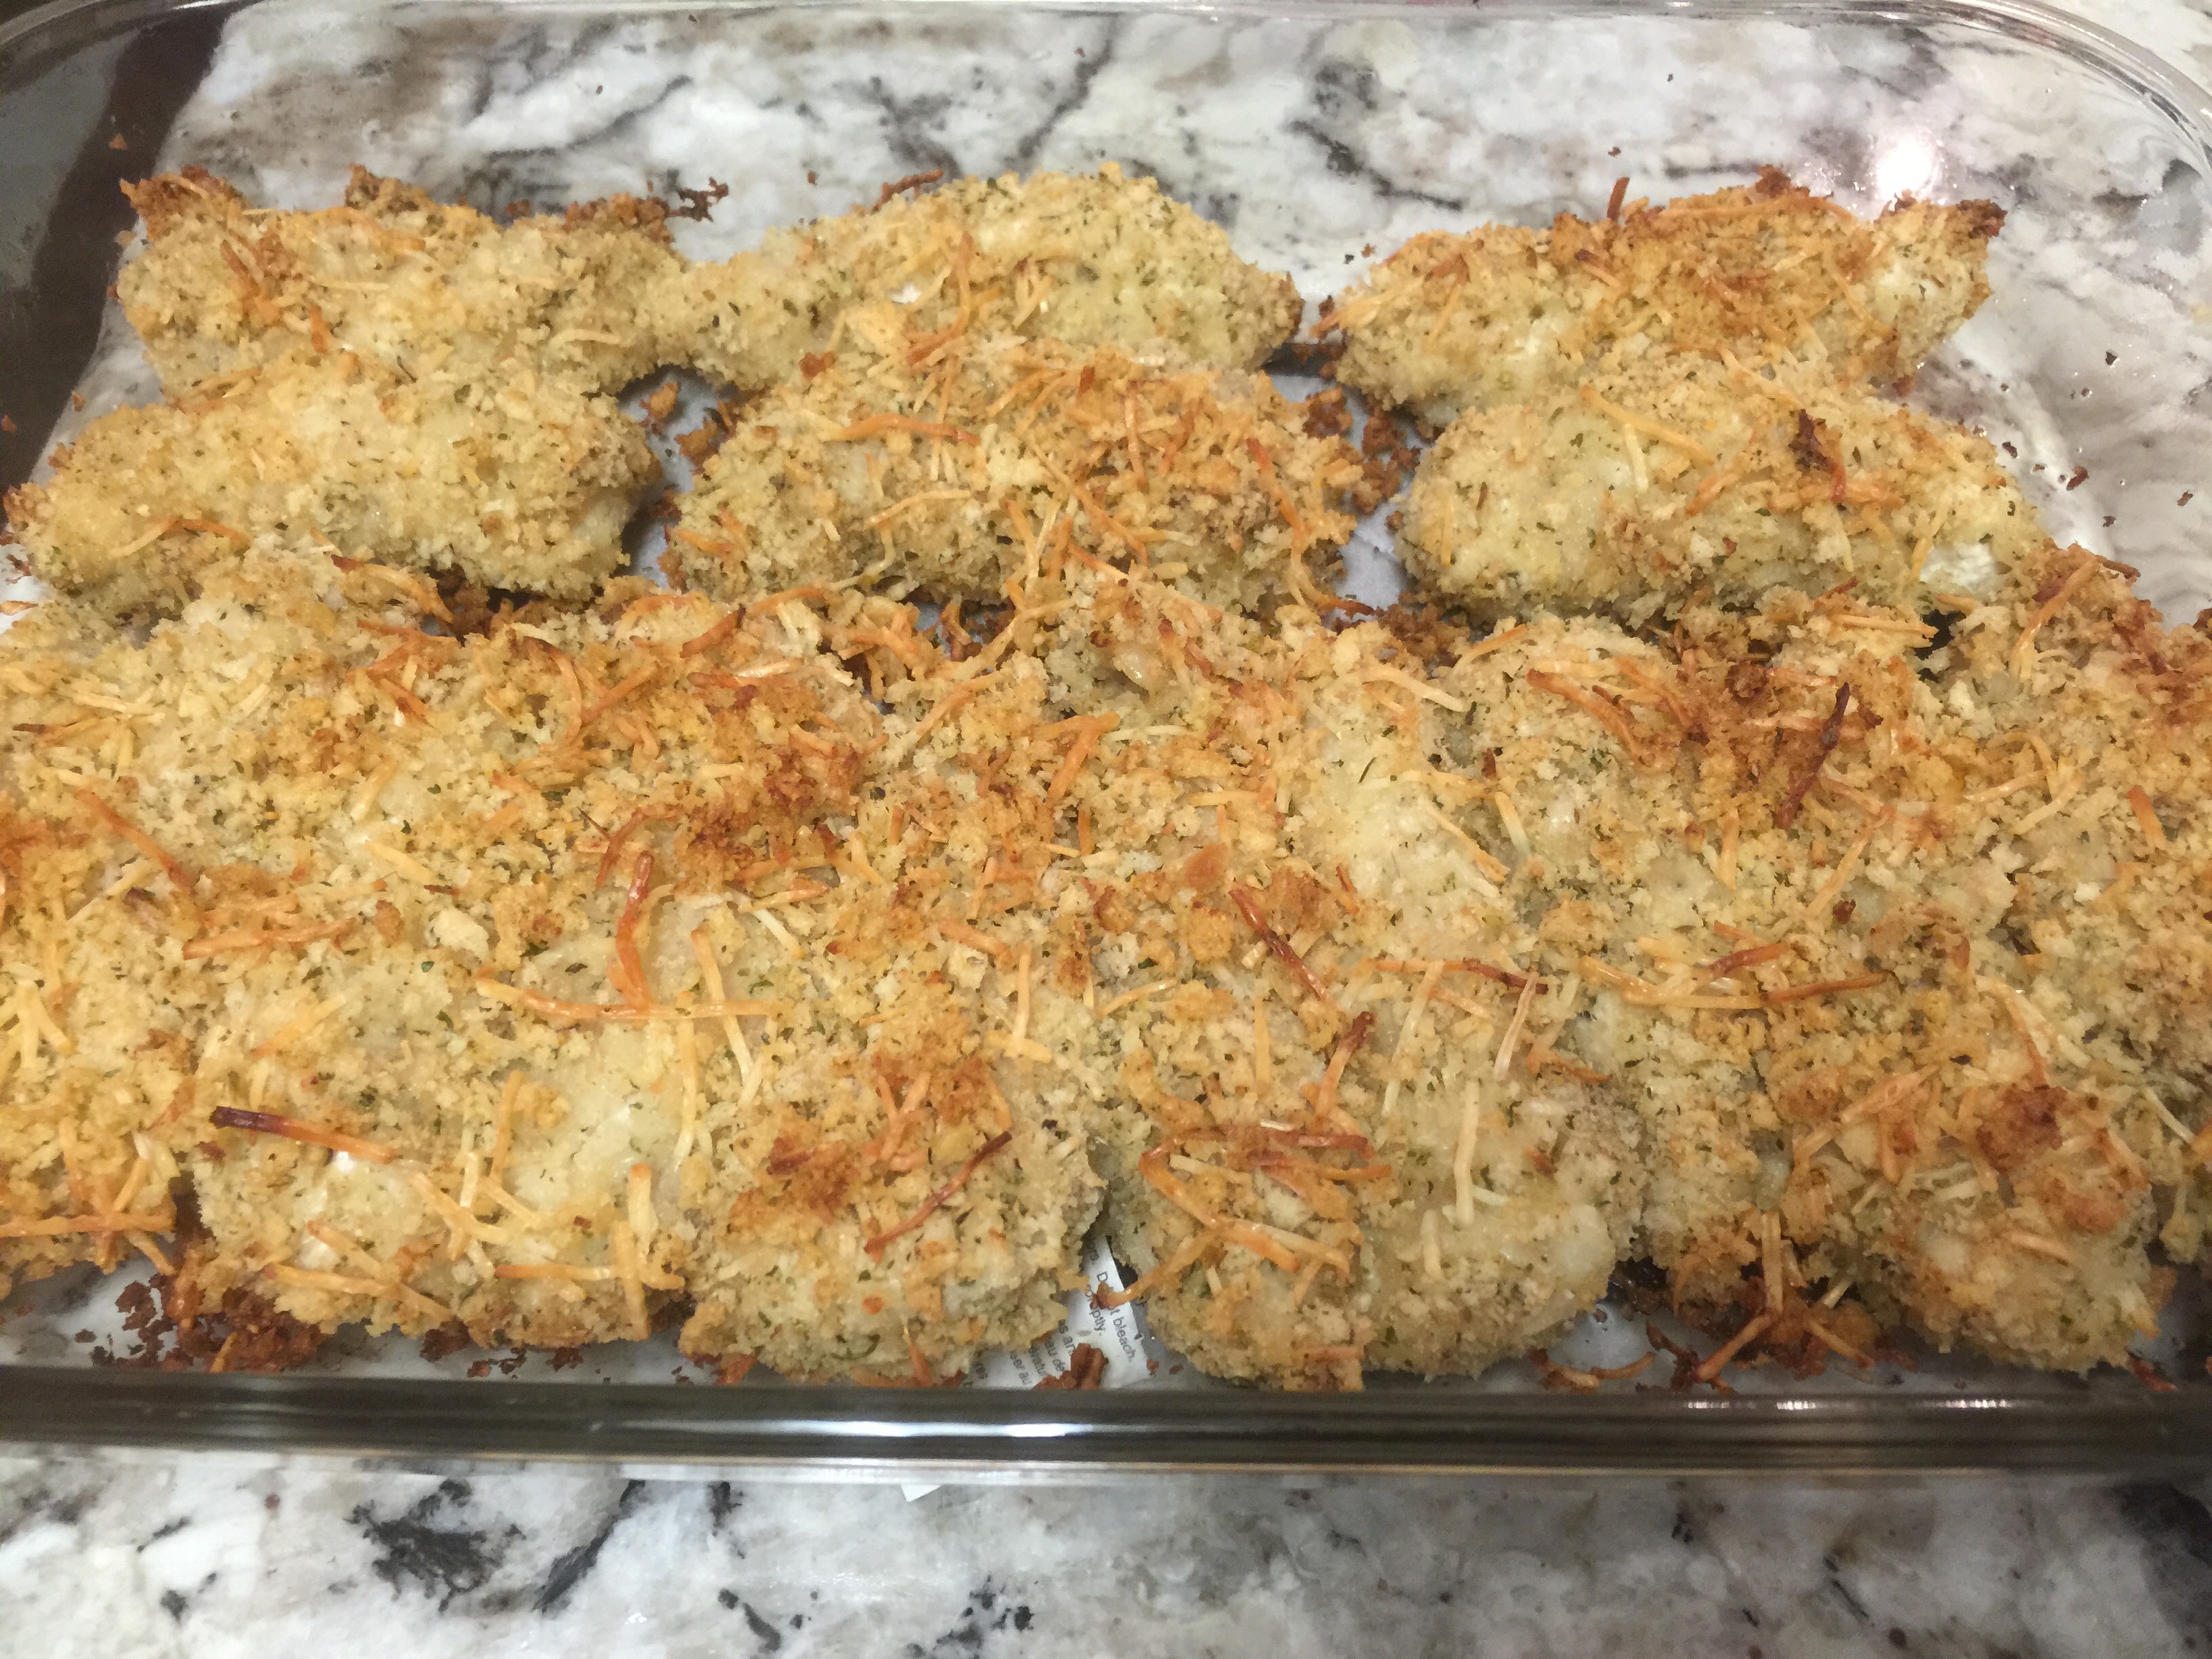
in a seperate zippy bag, combine bread crumbs and cheese. Add chicken and sqush around again to coat.Place chicken tenders in a single layer in a baking pan or sheet.Crispy Italian Chicken Tenders are moist and delicious!
Easy Italian Baked Chicken Tenders
2 pounds fresh chicken tenders
3/4 cup mayonnaise or Miracle Whip
2 cups Italian seasoned bread crumbs (or panko)
1 cup Pecorino or Parmesan cheese, grated
2 – 1 gallon size plastic storage bags
Place fresh chicken tenders in a large storage bag and add the mayonnaise. Seal bag. Using your hands, squish the mayo over and around the chicken, covering it completely.
In a separate storage bag, combine the bread crumbs and cheese. Drop several of the mayo coated chicken tenders in the bag with bread crumbs and toss them in the sealed bag. Make sure that they are well covered.
Lightly spray pan release in bottom of 13X9 rectangle pan or cookie sheet. Lay tenders on pan in a single layer. Bake at 400 degrees for 25 minutes until golden.
And now the yummy Tomato Bake…
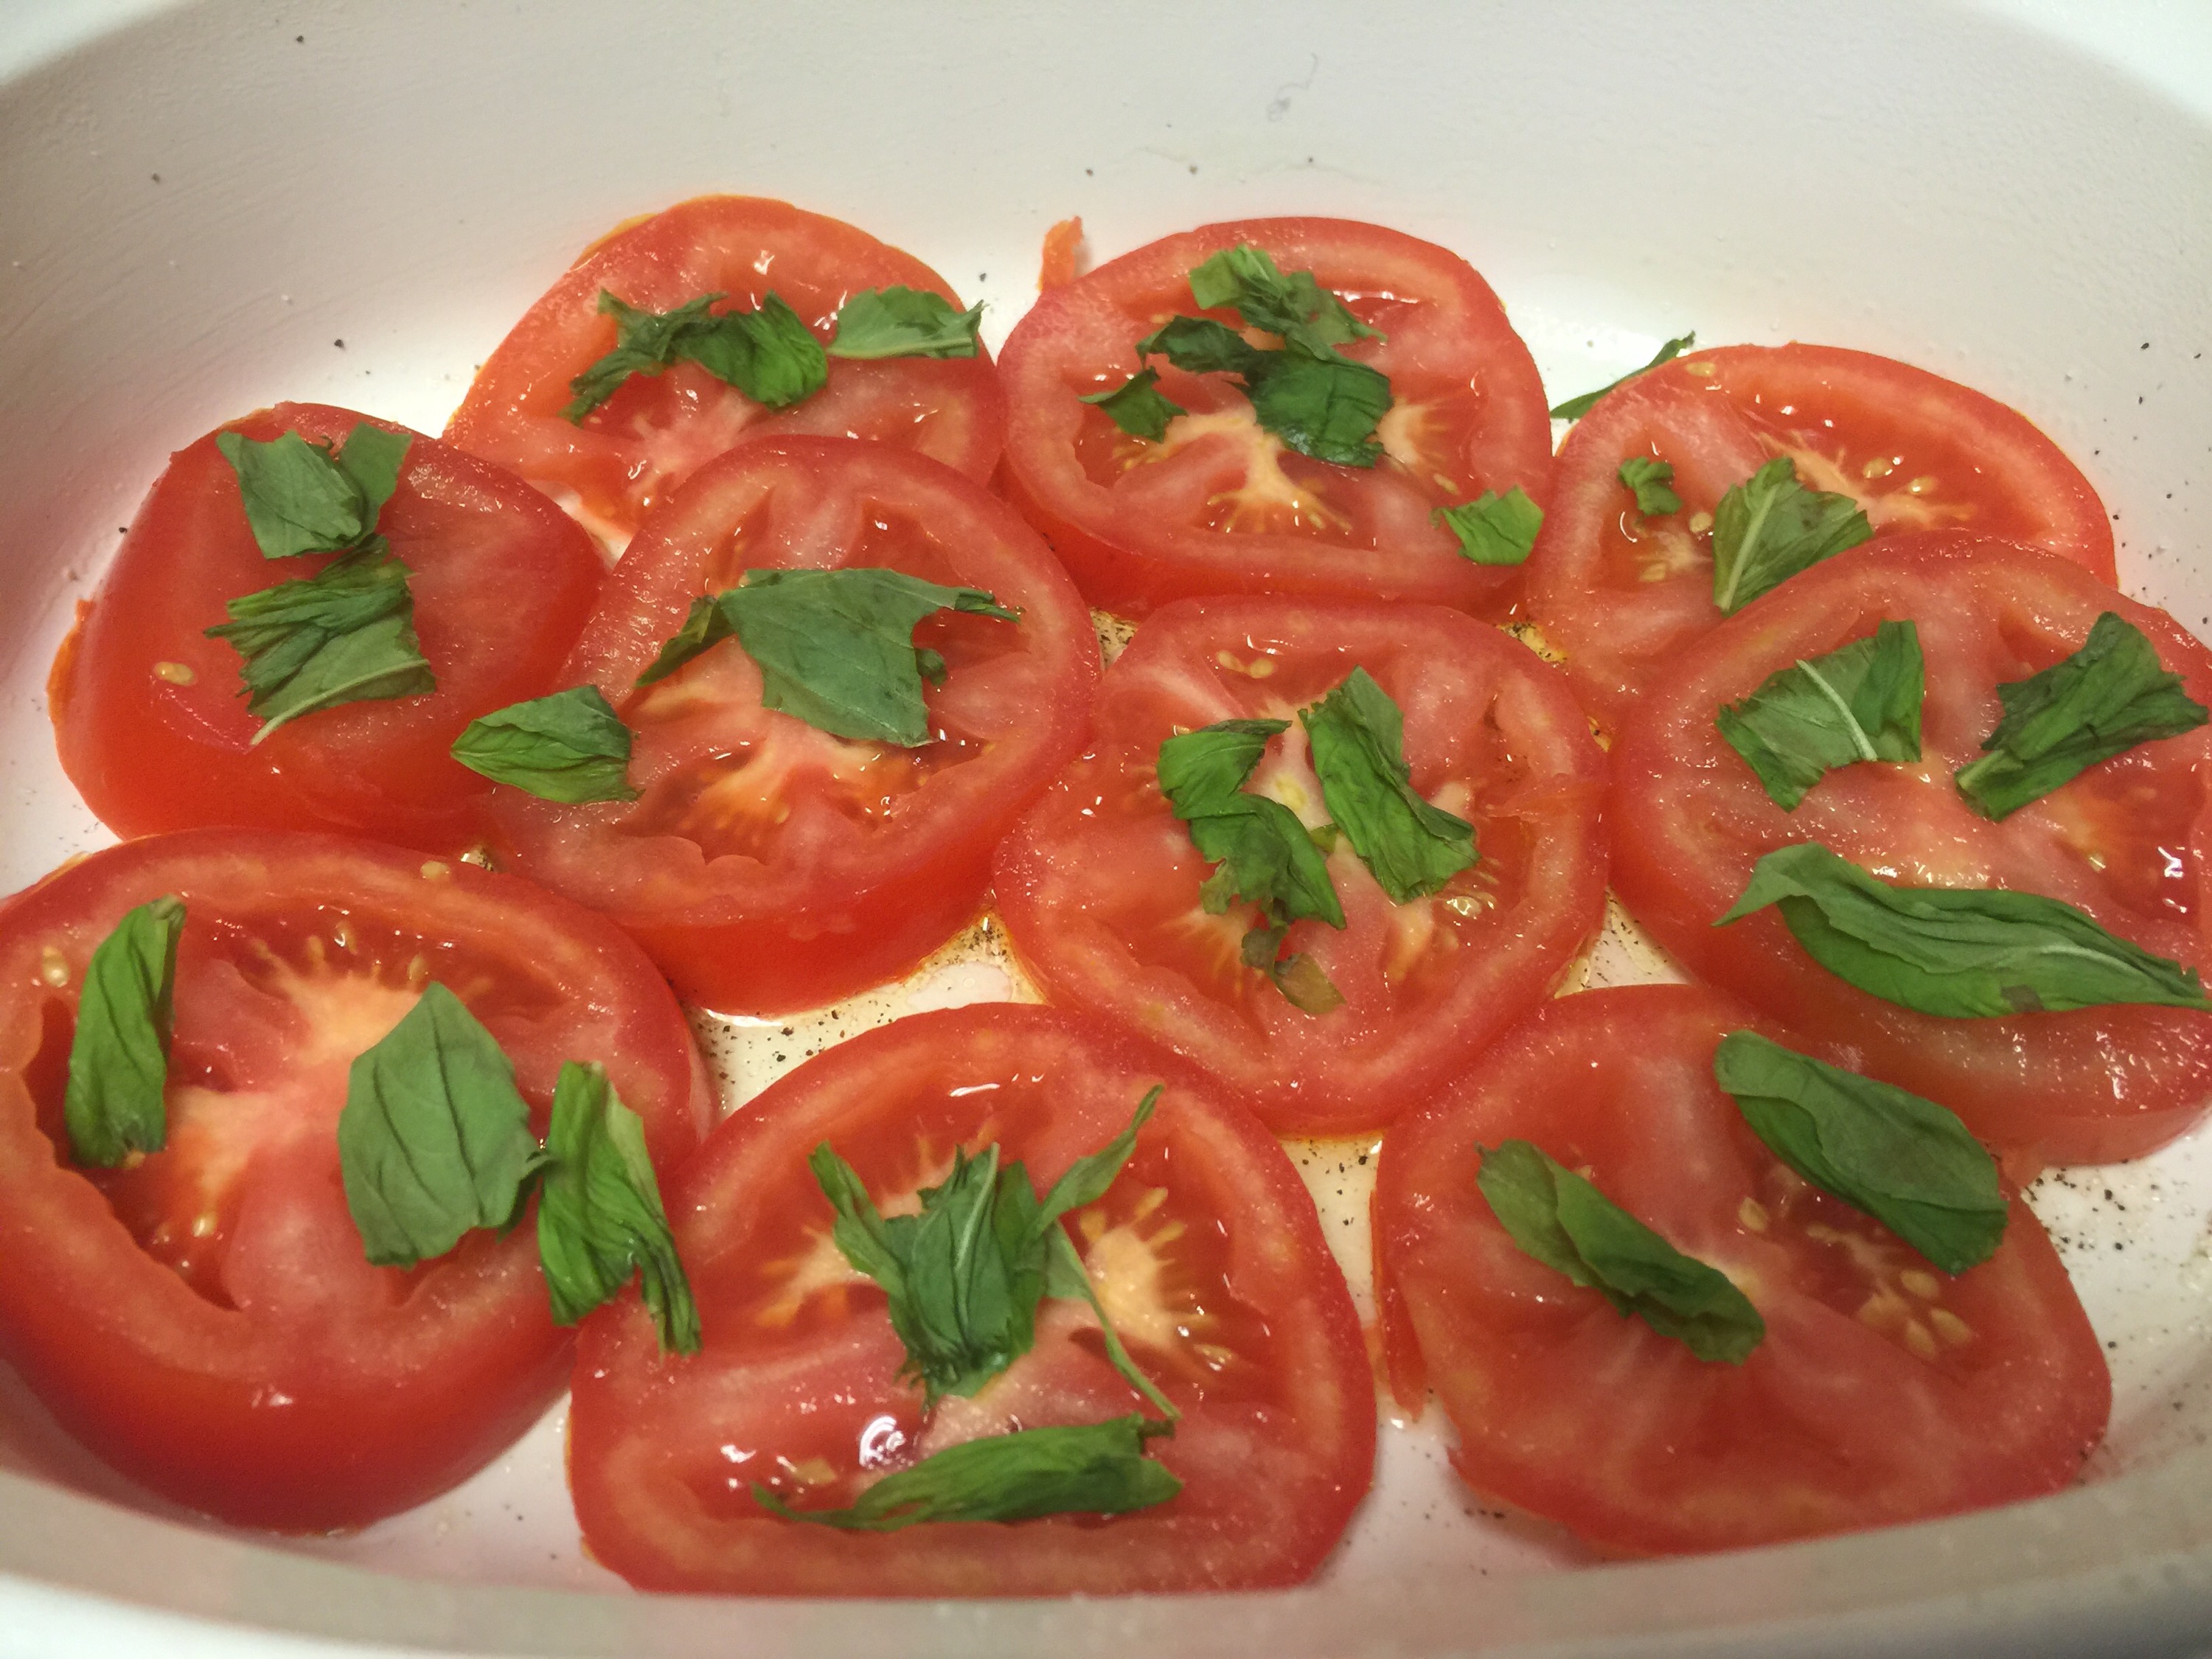
Slice tomatoes 1/4 inch thick and place in a single layer in prepared oval baking pan. Top with fresh basil.Top with bread crumbs and cheese then drizzle a little olive oil over the top
Italian Tomato Bake out of the oven and topped with additional fresh basil.
Baked Tomatoes
2 large tomatoes
Salt and black pepper
3 tablespoons olive oil
6 fresh basil leaves
1/2 cup Pecorino or Parmesan cheese, grated
1/4 cup Italian seasoned breadcrumbs (or Panko)
Spread 1 1/2 tablespoons olive oil in bottom of oval baking pan. Lightly salt and pepper the pan. Slice tomatoes about 1/4 inch thick and place in a single layer in pan. Lightly salt and pepper tomatoes. Tear fresh basil leaves and sprinkle them evenly on top of tomatoes.
Combine grated cheese and bread crumbs in a small bowl. Sprinkle mixture evenly over tomatoes. Drizzle with a little more extra olive oil if you’d like.
Bake at 400 degrees for 15 minutes. Garnish with additional fresh, torn basil leaves.
This is a seriously good cake. Not overly sweet. Perfect after dinner, on a hot afternoon with a cold glass of tea or in the morning with your coffee. Easily packs away in your or your kids lunch box. Any way you serve it will be enjoyable!
It’s even better the next day. That is if you can bare to save a slice that long.
Blueberry Snack Cake
Blueberry Snack Cake In a large bowl:
2 sticks unsalted butter, softened
1/2 cup sugar
2/3 cup packed brown sugar
Separately, whisk together in a medium bowl:
2 cups all purpose flour
1 teaspoon salt
1 tablespoon baking powder
3 large eggs
1 cup milk
3/4 cup fresh or frozen blueberries
For Topping
3/4 cup fresh or frozen blueberries
1/4 cup sugar
1/2 teaspoon ground cinnamon
Leave butter on your counter to soften
Leave butter on counter for about an hour to soften. If it’s summer in Texas, about 20 minutes on a plate in the shade outside will do.
Heat oven to 350 degrees. Grease and flour a 11X13 baking pan. Set aside.
Meanwhile, in a medium bowl, mix together the flour, salt and baking powder. Use a hand whisk to lighten the flour and give it a little air. Set aside.
Once butter is softened, add it to the sugars in a large bowl. Use a hand mixer to cream the sugars together until a smooth mixture forms.
Add cracked eggs one at a time to butter/sugar mixture, beating at medium speed. Add half the flour mixture, then half of the milk. Repeat flour and then milk till all is well incorporated.
For fresh blueberries, wash and dry with paper towels. Once dry, toss them with about a tablespoon of flour to coat. Doing this extra step will help keep the berries from falling to the bottom of your cake. (For frozen blueberries, do not defrost or they will make your batter a grey looking mess. Just add them to the cake batter straight out of the freezer.) Gently fold berries into the batter. Pour into prepared baking pan, spreading evenly.
For the topping: In a small bowl, combine the sugar and cinnamon. Drop reserved blueberries evenly on top of cake batter. Sprinkle with sugar cinnamon sugar.
Bake at 350 degrees on center oven rack for 40-45 minutes until a toothpick comes out clean. Cool about 30 minutes before serving. Little pockets of blueberries will be really hot.
Oh shoot! Just dive in if you want! The smell will be amazing!!
Try to save a piece or two to have with your morning coffee. You won’t regret it 😉
Blueberry Snack Cake is yummy with your morning coffee!
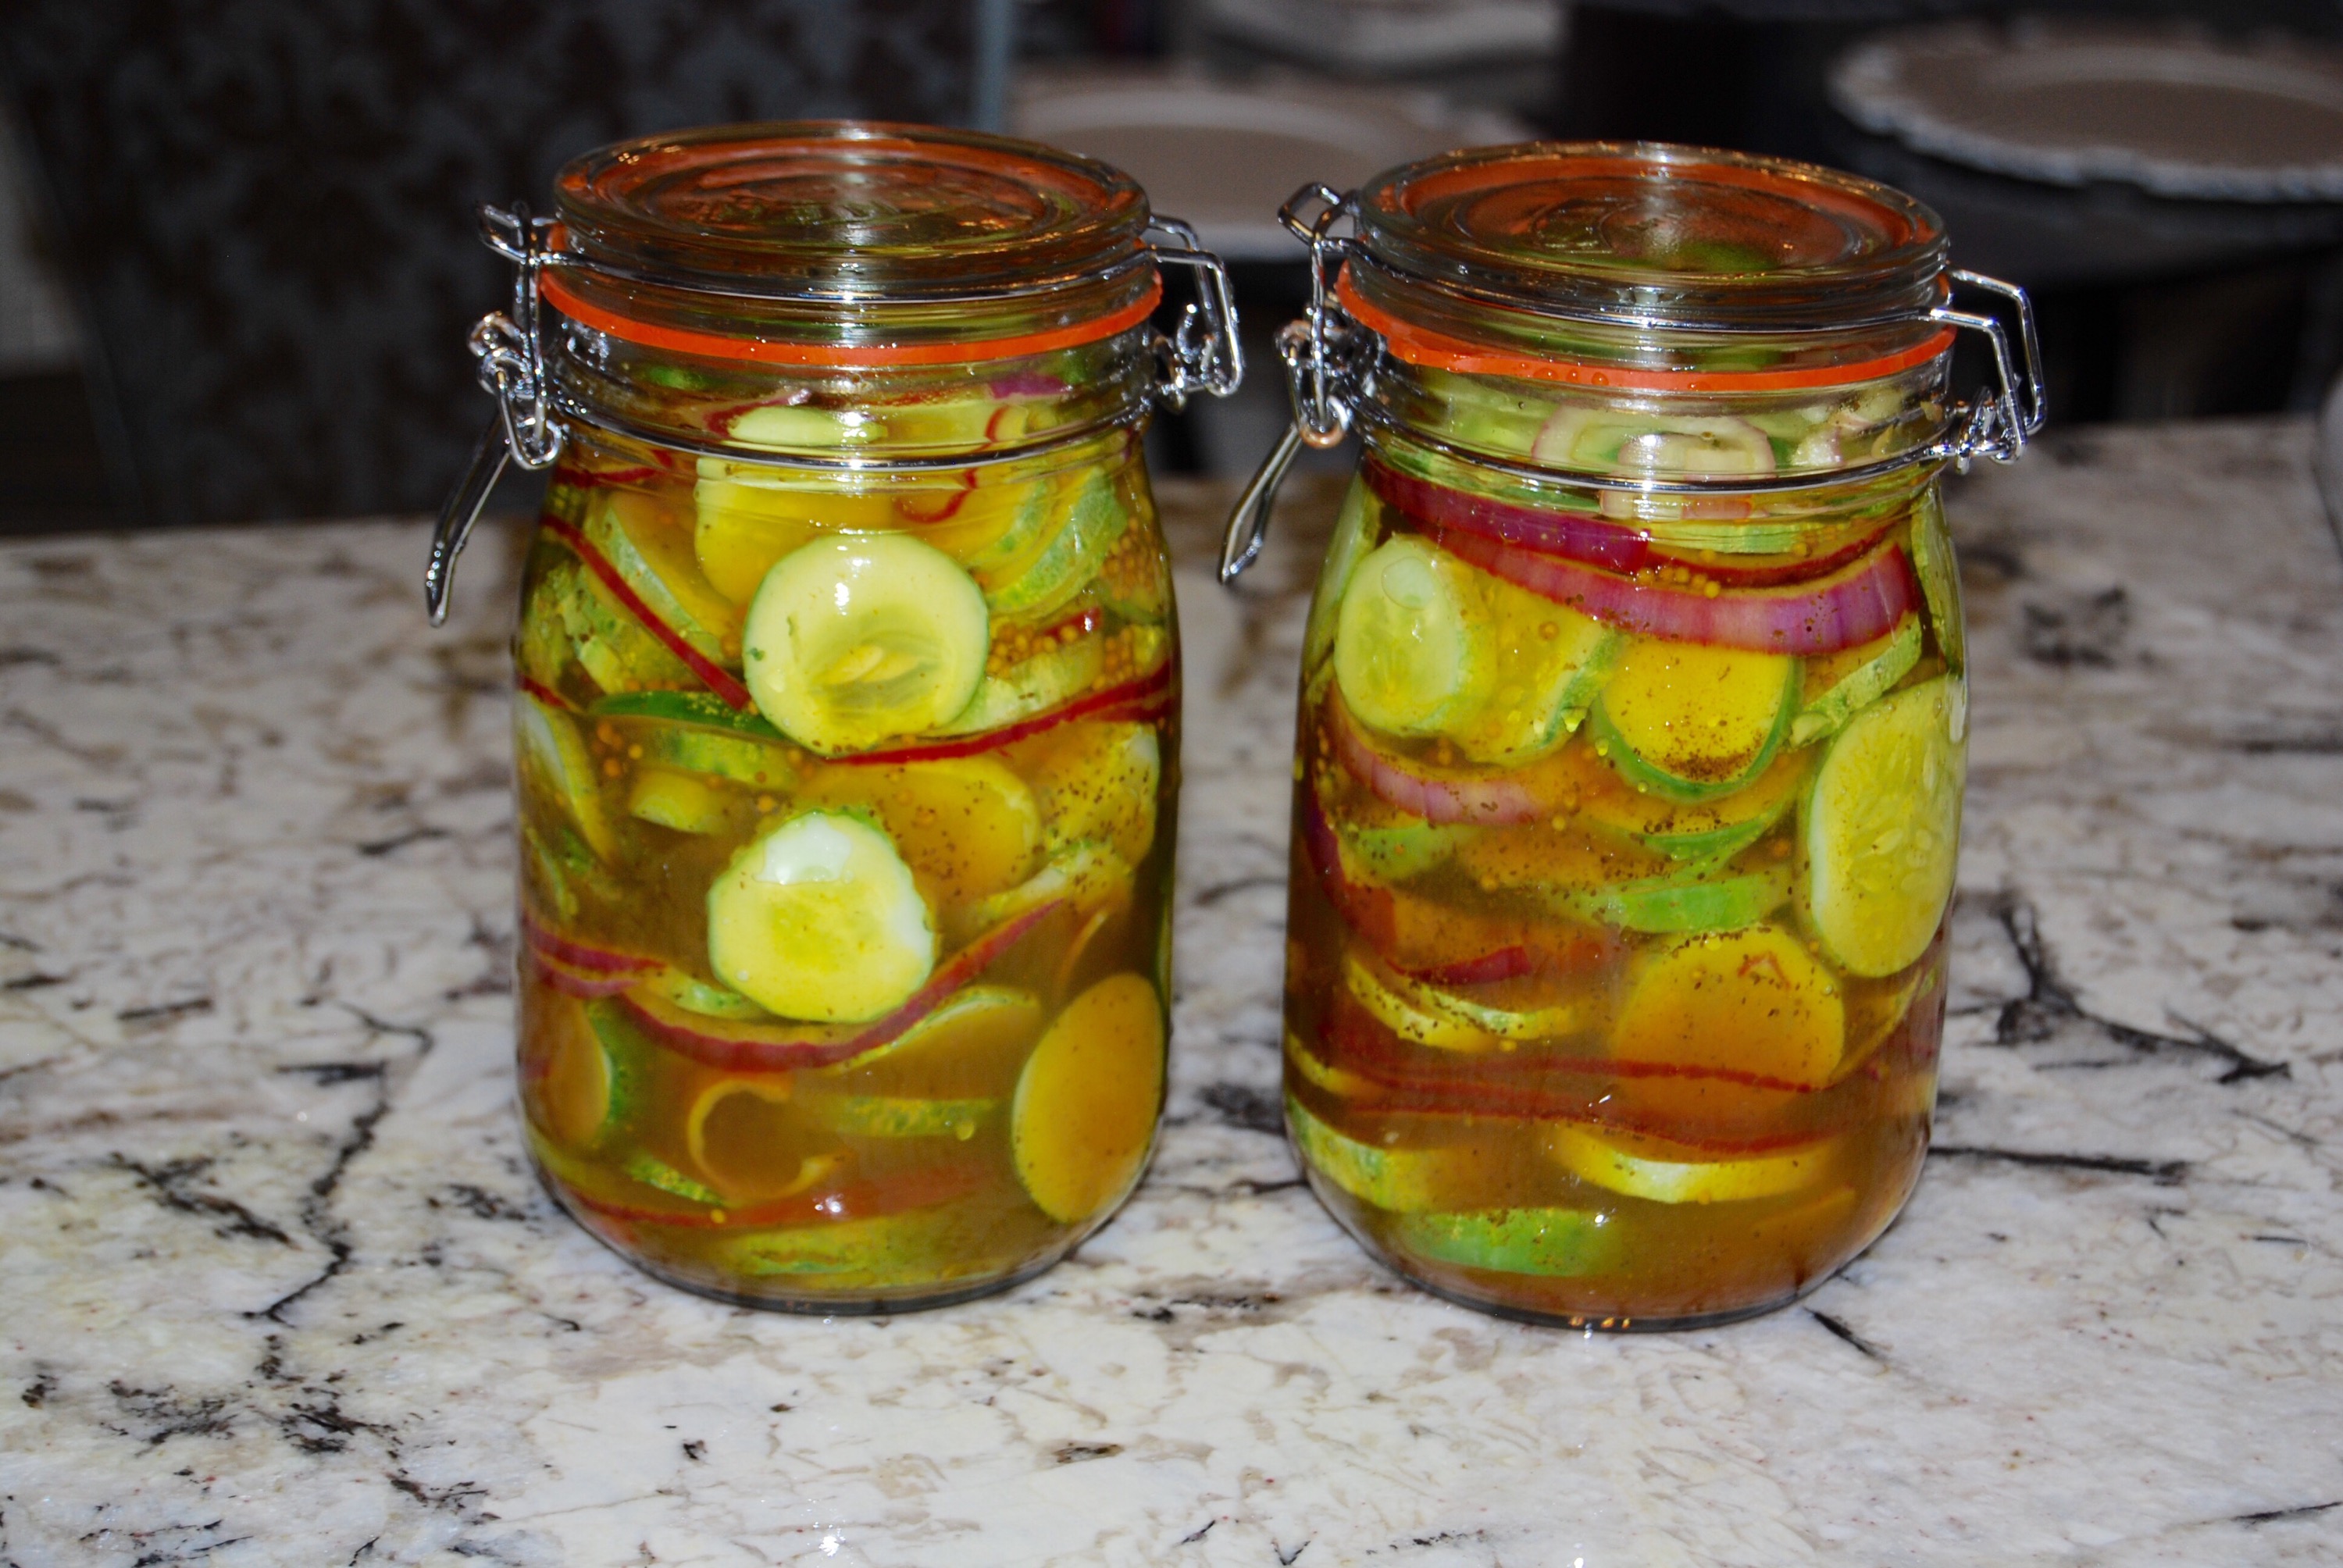
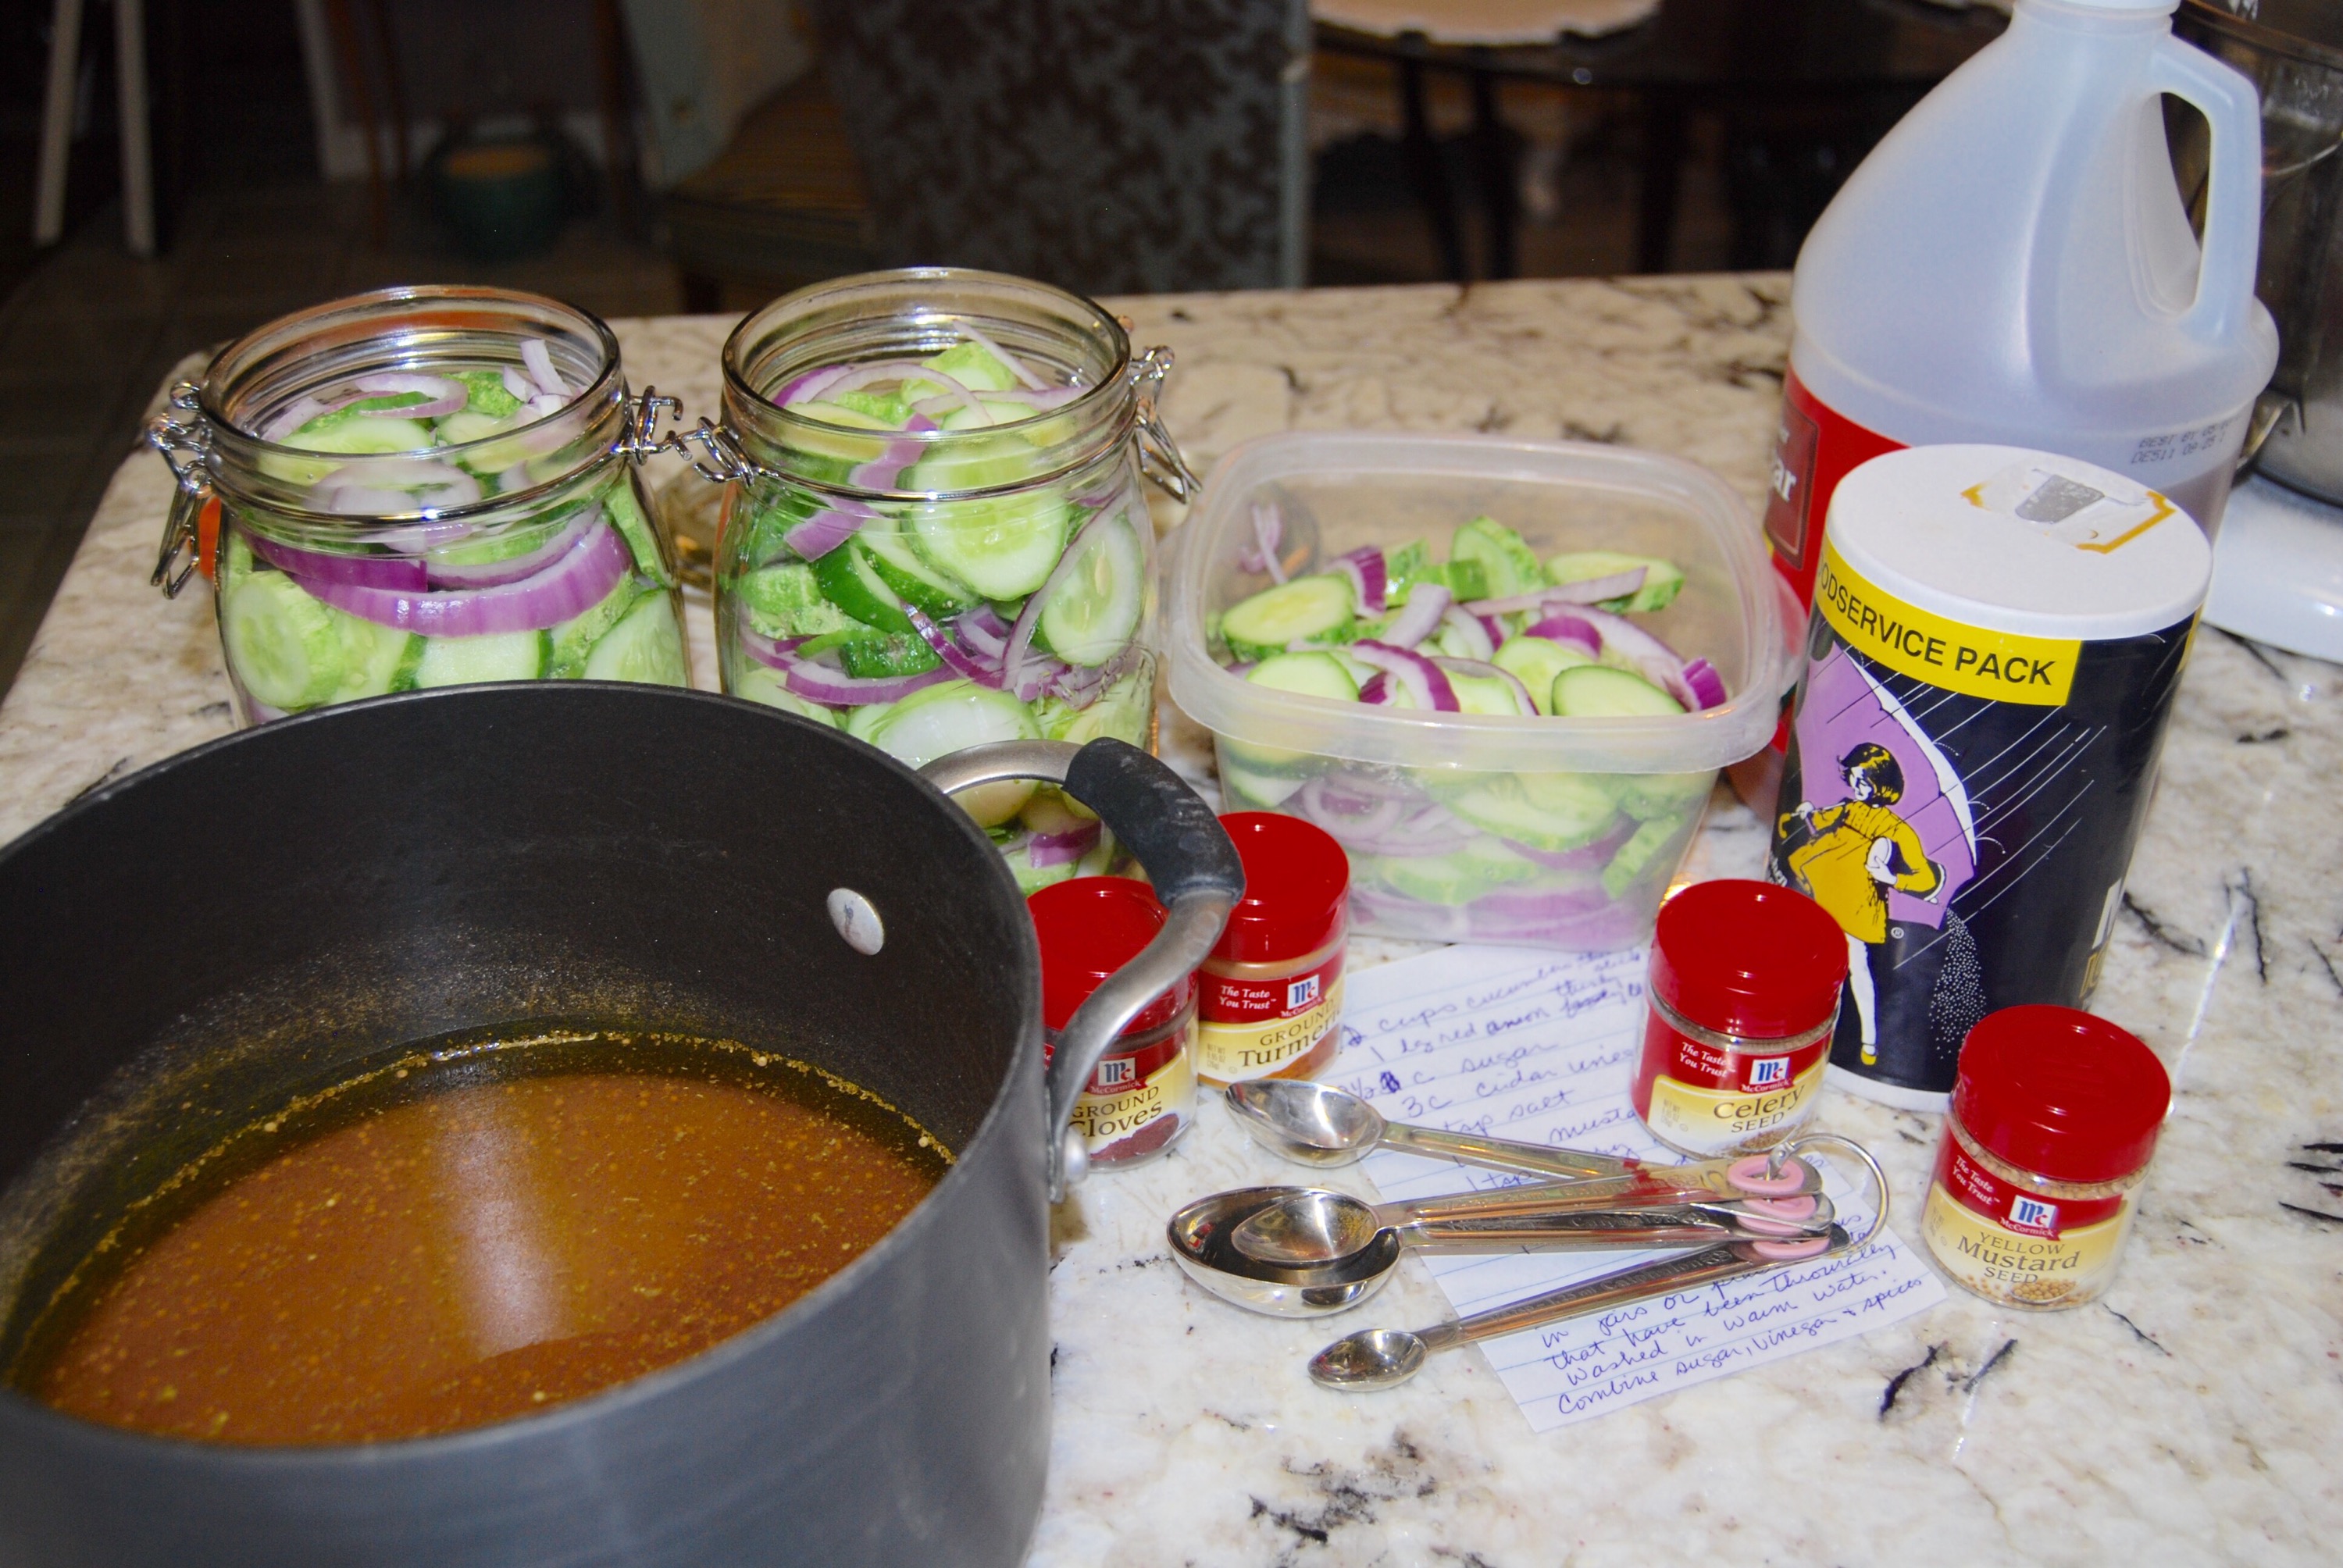
Super simple recipe that anyone can do and conquer canning!
I’ve tried growing a couple of pickling cucumber plants each spring, but never had much luck with them. Never enough to to make a batch of pickles. Just a few to add to cucumbers I pick up at our farmers market.
This year was quite different with all the rain we had this spring here in Waco. There was flooding in places all over Texas. So much that it made the national news. The natural pool at Tonkawa Falls in Crawford was higher than we had ever seen it before. Wish we still had some of that rain lingering around. The fall’s swimming area has already been closed because of its dramatic drop making the water stagnant. Hopefully we will see rain again soon.
Anyway, all that rain made for a bumper crop from my two little plants. I was able to make my zesty pickles with cucumbers just from my little garden.
These are great pickles that you don’t have to go through all the trouble that goes along with full fledged water bath canning. It’s a very forgiving recipe too. You can easily adjust this recipe to depending on the number of pickling cucumbers you have or add a little more spice if you like yours hot. I bought some kinda fancy jars I found at our neighborhood grocery store, but you can use just about any jar or container as long as you wash them really well in hot, sudsy water.
Easy Zesty Refrigerator Pickles
12 cups pickling cucumbers, thinly sliced
1 large red onion, thinly sliced
2 1/2 cups sugar
1 teaspoon salt
1 teaspoon mustard seed
1 teaspoon celery seed
1 teaspoon ground turmeric
1 teaspoon ground cloves
3 cups apple cider vinegar
Layer cucumbers and onions in jars or refrigerator containers that have been throughly washed in hot soapy water.
Combine sugar and all spices in a large saucepan mixing well. Add apple cider vinegar to mixture, stir continually and bring to a simmer over medium heat to dissolve sugar.
Carefully pour hot mixture over cucumbers and onions. Cover tightly and store in refrigerator at least 24 hours. Will stay fresh in the refrigerator until all are used.
*be sure to clean up any spilled liquid right away as it can stain your counter top!! Wooh! Almost learned this the hard way!!
I may be known for baking some of the best made from scratch pies in the state of Texas, but did you know I've been a professional photographer for about 40 years now? Yikes!! That's a long time!! This blog is about combining my love of food, photos and traveling. I invite you to come along on my journey!